1. The Swift Language
A Swift script describes data, application components, invocations of applications components, and the inter-relations (data flow) between those invocations.
Data is represented in a script by strongly-typed single-assignment variables. The syntax superficially resembles C and Java. For example, { and } characters are used to enclose blocks of statements.
1.1. Conventions
The following conventions will be used throughout the guide:
-
Swift source listings will appear in the following form:
// Swift script code -
When describing syntax, the code will appear as follows:
<rule> := <definition>The following conventions are used for syntax blocks:
-
Angle brackets indicate a labeled item that is to be substituted when writing actual code:
<variableName>can be used to meana,b,myVariable, etc. -
Square brackets indicate optional items:
[something optional] -
Single quotes indicate a literal character or string when the literal could otherwise be interpreted as being part of a special syntax symbol:
'['means a literal left square bracket and not the beginning of an optional item. -
The pipe symbol is used to indicate two or more mutually exclusive choices:
A | C | Bmeans eitherAorBorC. -
Parentheses are used for groupping
-
The asterisk (
*) is used to indicate zero or more repetitions of the operand immediately to the left. For example,A*signifies that the letterAcan appear any number of times, including not at all. -
A plus sign (
+) is used to indicate one or more repetition(s)
-
Examples:
[<this is something optional>]

<first alternative> | <second alternative>

(<first> <alternative>) | <second alternative>

<this can be repeated any number of times including none>*

<one or more of these are possible>+
1.2. Values
Values in Swift are the most basic form of data. All values have an associated
type. Examples of values are 1.0, "a string", etc.
1.3. Variables
Swift variables are symbols that hold values. Variables have a type, which is specified when the variable is declared. It is also possible to assign a value to a variable when the variable is declared. A variable declaration has the following syntax:
<type> <name> [= <value>];It is also possible to declare multiple variables of the same type in one line:
<type> <name> [= <value>] (, <name> [= <value>])*Examples:
int a;
string message = "A message";
int c = 1, d = 2;
Variables must be assigned a value exactly once. The following Swift program will result in compile-time errors:
int a = 2;
a = 3;

int b;
f(b);
int b;
f(b); 
| Error: variable "a" can only be assigned once | |
| Error: variable "b" is not initialized |
1.3.1. Types of Variables
There are two types of variables:
- Local variables
-
Local variables are “normal” variables which can be declared in any scope using variable declarations as shown above.
- Global variables
-
Global variables are variables that are declared in the main scope and are visible in all the scopes in a Swift program. Their declaration is prefixed with the keyword
globalas shown below:Global Variableglobal <declaration>;Example:
global float PI = 3.14159;
1.3.2. Scoping Rules
There are three types of scopes: the main scope, function scopes, and sub-scopes. Variables declared in a scope are always visible within that scope, regardless of whether they are declared lexically before use or not.
- Main scope
-
The global scope is the top-level scope of a Swift program. Global variables can only be declared in the main scope.
- Sub-scopes
-
Sub-scopes are scopes introduced by code blocks, which are sections of code surrounded by curly brackets (
{…}) with the exception of function scopes. Sub-scopes create a hierarchy. Each sub-scope has a parent, which may, in turn, have its own parent. A variable declared in a scope is visible in all of its sub-scopes and then recursively visible in all sub-scopes of each sub-scope. A variable declared in a scope cannot be re-declared in a sub-scope. In other words, shadowing is not allowed:int a = 1; if (true) { int a = 2; // Illegal: shadowing is no allowed }Whenever a variable is referenced in a scope, the Swift compiler will search for the corresponding variable declaration starting with the scope from which the reference is made and, if not found, continue recursively with all ancestor scopes until a declaration is found. Function scope:: A function scope is the scope of the body of a function declaration. The following are visible in a function scope: global variables, the formal parameters of the function, and variables declared within the function body. A function scope can have its own sub-scopes.
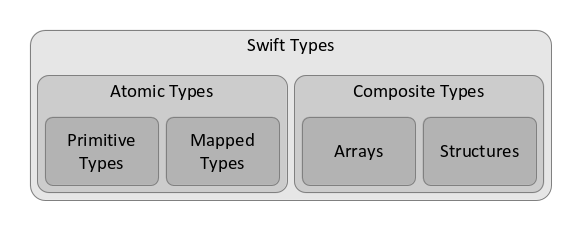
1.4. Types
Types in Swift can be atomic or composite. An atomic type can be either
a primitive type or a mapped type. Swift provides a fixed set of primitive
types, such as integer and string. A mapped type indicates that the actual
data does not reside in CPU addressable memory (as it would in conventional
programming languages), but in POSIX-like files. Composite types are further
subdivided into structures and arrays. Structures are similar in most
respects to structure types in other languages.
1.4.1. Primitive Types and Values
A primitive type is a type that represents a single item stored in internal
memory. The primitive types in Swift are int, string, float, and boolean.
int
The int type represents a 32 bit integer. Integer value literals are of the
form:
['+'|'-']<digit>+Examples:
int a = +1;
int b = -2;
int c = 9999999;
string
A string represents a sequence of characters. String literals are enclosed in double quotes and have the following form:
'"'(<stringCharacter> | <escapeSequence>)*'"'Where <string character> is any character except double quotes or a backslash
('\'), and
<escape sequence> := '\' ('n' | 'r' | 't' | 'b' | 'f' | '"' | '\')The following table lists the meaning of the escape sequences:
| Sequence | Meaning |
|---|---|
|
a literal backslash |
|
new line (ASCII code |
|
carriage return (ASCII code |
|
tab (ASCII code |
|
backspace (ASCII code |
|
form feed (ASCII code |
|
a literal double quote character |
Examples of string literals include:
string a = "A string";
string b = "A string containing a \n newline";
string c = "\"A string in quotes\"";
float
Floats represent a double precision (64 bit) floating point number. Float literals have the following syntax:
['+'|'-'] <digits> '.' <digits> [('e' | 'E') ['+'|'-'] <digits>]Example:
float a = 1.0;
float b = -1.2e-3;
float c = 2e50;
boolean
A boolean represents a truth value. Boolean literals are either true or
false.
boolean a = true;
boolean b = false;
1.4.2. Mapped types
Mapped types are types that represent data that resides in a (single) file. They can be thought of as file references (or pointers to files). Users can define any number of mapped types to distinguish between different types of files used in a Swift program. A mapped type can be defined as follows:
type <typename>;When declaring a mapped type, an optional mapping can be specified in order
to describe the location of the file represented by a variable. The following
example declares a mapped type and variable that points to a file named
input.txt:
type image;

image input <"input.txt">;|
|
See also: File Mapping, Mapper Library, External Type |
1.4.3. Structures and Structure Expressions
Structures are types that can be used to encapsulate a fixed number of fields and are similar to structures in C. A structure’s fields can mix primitive, mapped and composite types. The syntax for declaring a structure is as follows:
type <structName> {
  [<type> <fieldName>;]+
}
Fields in a structure can be accessed as follows:
<variable>.<fieldName>The following example declares and uses a structure named Employee that holds
some basic data of a hypothetical employee:
type employee {
  string name;
  int id;
  string location;
}

employee e;
e.name = "John Doe";
e.id = 1000;
e.location = "Room 1401";
It is also possible to initialize structure variables using a structure expression. The syntax of a structure expression is:
{ (<key>: <value>)* }The last part of the employee example above can be simplified to:
employee e;
e = {name: "John Doe", id: 1000, location: "Room 1401"};|
|
See also: readData(), writeData(), read(), write() |
1.4.4. Arrays and Array Expressions
Swift arrays are data types that contain a variable number of items of the same type. Each item in an array has an associated key or index. Arrays can be declared as follows:
<itemType> '[' <keyType> ']' <arrayVariableName>;Key types are restricted to primitive types. If the keyType is omitted, it
defaults to int:
<itemType> '[]' <arrayVariableName>;

// this is equivalent to

<itemType> '[' int ']' <arrayVariableName>;
Arrays in Swift are automatically grown to accommodate the number of items stored in them. Additionally, arrays are sparse. In other words, array keys can be arbitrary values (as long as they match the declared key type).
Array items are accessed using the following syntax:
<arrayVariableName> '[' <keyValue> ']'For example, the following snippet of code declares an array with int keys
(the default) which stores string values and adds a few items to it:
string[] array;
array[0] = "Zero";
array[2] = "Two";
array[100] = "One hundred";
The following is an example of an array with strings as key values:
float[string] constants;

constants["PI"] = 3.14159;
constants["e"] = 2.71828;
If the item type is a structure type, Swift allows a “slicing”
access mode that produces an array with all the values of a particular field of
the item type and with the same key type as the key type of the array. The
syntax is the same as for structure field access. In other words, if s is a
structure containing some field f, and if a is an array of s, then the
following are equivalent: a[<index>].f and a.f[<index>]. Example:
type myStruct {
    int a;
    float b;
}

myStruct[] array = [{a: 1, b: 0.1}, {a: 2, b: 1.6}];

f(array.b);
Invokes function f with an float[] array equal to [0.1, 1.6].
|
Alternative ways of initializing arrays are: array expressions, sparse array expressions, and range expressions.
Array Expressions
Array expressions have the following basic syntax:
'[' [<value> (, <value>)*] ']'When array expressions are used, indices are automatically created by Swift, starting from zero for the first array item and incrementing by one for each subsequent element:
string[] array = ["Zero", "One", "Two"]

trace(array[0]); // "Zero"
trace(array[1]); // "One"
trace(array[2]); // "Two"
Sparse Array Expressions
Sparse array expressions can be used to initialize an array with values that correspond to non-consecutive or non-integer keys. The syntax of a sparse array expression is:
{ [<key>: <value> (, <key>: <value>)*] }Examples:
float[string] constants;

constants = {"PI": 3.14159, "e": 2.71828};

string[] orders;

orders = {1: "One", 10: "Ten", 100: "Hundred", 1000: "Thousand"};
Range Expressions
Range expressions are compact way of describing arithmetic sequences. The syntax is:
'[' <from>:<to>[:<step>] ']'A range expression returns an array containing the sequence of numbers starting
at <from>, with the last element not greater than <to> and with a difference
if <step> between two consecutive elements. The parameters must be numeric
literals. If they are integers, then the returned array has type int[] and
the step is optional (assumed to be 1 if missing). If the parameters are
float literals, the type of the range expression is float[] and the step is
mandatory. The actual implementation generates lazy arrays for range expressions.
Example:
int[] a = [1:4]; // a = [1, 2, 3, 4]
int[] b = [1:6:2]; // b = [1, 3, 5]
int[] c = [0.0:10.0:3.33]; // c = [0.0, 3.33, 6.66, 9.99]|
|
See also: Auto Key Type |
1.4.5. Special Types
Special types are types that do not fall neatly into any of the above categories.
There are two special types in Swift: auto and external.
The Auto Type
The auto type is used as a special array index type. Arrays declared
with an auto key type can be constructed progressively, without regard
to what particular value the index for an item will be. It is used
in conjunction with the append operator (<<). The
auto type does not have associated literal values, and items in an
array declared with auto indices cannot be accessed randomly. Certain
operations, such as the foreach statement,
can be used to associate a variable of type auto with an opaque value
that can be used to refer to items in arrays with auto keys. The
following example attempts to clarify this:
int[auto] a;
a << 1;
a << 2;
a << 4;
a << 8;

int[auto] b;

foreach value, key in a {
    b[key] = a[key];
}

// b is now an exact copy of a
The external type
The external type is a special type of mapped type. It tells Swift to suspend
its normal file management when dealing with variables of type external (see
File Management). This is
distinct from Swift’s [runtime:order-of-operations], dependency tracking
mechanism>>, which remains in effect. The purpose of the external type is
to expose otherwise hidden dependencies to Swift in order to ensure correct
functioning of a script.
1.5. Mapping Declarations
Variables with a mapped type or a composite type containing mapped types will have an associated physical file for every mapped value. Mappers allow a user to specify how mapped values are associated with physical files. Mappers are specified as part of the variable declaration as follows:
<type> <name> '<' <mapperName>; [<mapperParameters>] '>';where
<mapperParameters> := <name> = <value> (, <name> = <value>)*Mapper parameters can be specified in any order. Certain mapper parameters are mandatory, while others can be omitted and assume default values.
Example:
type file;

file inf <SingleFileMapper; file = "input.dat">;
As a shortcut, it is possible to use a string literal when only one mapped value (or file) is involved. The previous example is equivalent to:
type file;

file inf <"input.dat">;
The usefulness of mappers becomes more obvious when more complex data structures are involved. A number of mappers support deeply nested data structures and arrays. These can be used to automatically provide a mapping between non-trivial collections of files and Swift variables.
If a variable of a mapped type is declared without an explicit mapping declaration, Swift will default to using the ConcurrentMapper, which automatically assigns temporary files to mapped values.
|
|
See also: File Mapping, Mappers. |
1.6. Expressions
Expressions are pieces of code that produce a value as a result. Previous sections already contain a few examples of expressions, namely array expressions, structure expressions, and range expressions. In addition to that, value literals are also expressions. What follows is a description of all expression types in Swift:
- Primitive type literals
-
Also called constants, these are literal values corresponding to Swift’s primitive types. They are described in the section about primitive types and values.
- Variable references
-
Variable references produce the values currently stored in the referenced variable. When a variable name is used in an expression context, Swift applies the scoping rules to determine the particular variable to be used and produces its value.
- Array expressions
-
Used to construct array values. See array expressions.
- Sparse array expressions
-
Used to construct array values with sparse keys. See sparse array expressions.
- Range expressions
-
Produce arrays containing arithmetic series. See range expressions.
- Structure expressions
-
Used to construct structure values. See structure expressions.
- Array subscript references
-
Similar to variable references, array subscript expressions are used to obtain the value of a particular item in an array.
- Structure field references
-
Produce the value stored in a field of a structure-typed variable or, in the case of the structure array references, an array with values stored in a field of a structure-typed variable.
- Function expressions
-
Function expressions produce the result of the application of a function to some parameters. For details, please see the section about functions.
- Operator expressions
-
Operator expressions differ from function expressions in syntax and in that, unlike functions, operators are not user-defineable. For details, see the section on operators.
1.7. Operators
Swift provides a standard set of arithmetic and logic operators. There are two types of operators: unary and binary. Unary operators are operators that have a single operand. They are used in prefix notation:
<unaryOperator> <operand>Binary operators have two operands and are used in infix notation:
<operand> <binaryOperator> <operand>Each operator has a precedence level. If two or more operators with the same
precedence level appear consecutively in an expression, the expression is
evaluated from left to right. In the following example, <op1> is evaluated
first, followed by <op2>:
<value1> <op1> <value2> <op2> <value3>Specifically, <value1> <op1> <value2> is calculated, yielding
some value which we will call <intermediate>. The value of the entire
expression will then be <intermediate> <op2> <value3>:
This behavior can be modified by using parentheses, which ensure that their
contents is evaluated as a standalone sub-expression. In the previous example,
parentheses can be used to force the evaluation of <op2> first:
<value1> <op1> '(' <value2> <op2> <value3> ')'If two or more consecutive operators have different precedence levels, then the
operators are evaluated in the order of their precedence, starting with the
lowest level. For example, multiplication has a lower precedence level than
addition, so the following expression evaluates to 7 rather than 8:
1 + 2 * 3The following table lists the precedence level of Swift operators:
| Level | Operator(s) | Description |
|---|---|---|
1 |
|
Logical negation |
1 |
|
Negation operator |
2 |
|
Multiplicative operators |
3 |
|
Additive operators |
4 |
|
Relational operators |
5 |
|
Equality operators |
6 |
|
Logical AND |
7 |
|
Logical OR |
The types of the operands are relevant, and there may exist multiple
implementations for an operator, depending on the types of the operands. For
example, the addition operator, \+, can either add integers or floating point
numbers, and the type of the resulting value will depend on the type of
operands. When describing operators, the operand types and result types are
indicated using the following syntax:
<unaryOperator> <operandType> -> <resultType>

<operandType> <binaryOperator> <operandType> -> <resultType>
The unary operators in Swift are:
-
! boolean -> boolean -
Logical negation operator.
-
- int -> int -
Integer negation operator.
-
- float -> float -
Float negation operator
The binary operators are:
-
int * int -> int -
Integer multiplication
-
float * float -> float -
Floating point multiplication
-
int * float -> float -
Floating point multiplication. The integer operand is first converted to a float and then the multiplication is performed as with
float * float -> float. -
float * int -> float -
Same as above.
-
int / int -> float -
Floating point division. The operands are first converted into floats and then the division is performed. For example, the result of
3 / 2is1.5. -
float / int -> float,int / float -> float,float / float -> float -
Same as above except that for operands that are already
float, no conversion is necessary. -
int %/ int -> int -
Integer division. Evaluates the quotient of the division of the first operand (divisor) with the second operand (dividend). The quotient is defined as the number with the largest absolute value such that
|quotient * dividend| < |divisor|.The quotient is negative if the divident and divisor have opposite signs. Example:
int q1 = 5 %/ 2; // 2 int q2 = -7 %/ 2; // -3 -
int %% int -> int -
Integer remainder. The result of this operation is a number,
r = (a %% b), such that(a %/ b) * b + r = a -
float %% float -> float -
Floating point remainder. The result of
a %% bis a floating point numberr, such thatr = a - (b * q), where q is an integer whose magnitude is as large as possible while satisfying|b * q| < |a|. -
int + int -> int -
Integer addition. Self explanatory.
-
float + float -> float,float + int -> float,int + float -> float -
Floating point addition. Also self explanatory.
-
string + any -> string,any + string -> string -
String concatenation. Evaluates to a string formed by concatenating the string representation of the first operand with the string representation of the second operand.
-
int - int -> int -
Integer subtraction
-
float - float -> float,float - int -> float,int - float -> float -
Floating point subtraction.
-
int < int -> boolean,float < float -> boolean -
Less than. Evaluates to
trueif the first operand is strictly less than the second operand. Otherwise it evaluates tofalse. -
int <= int -> boolean,float <= float -> boolean -
Less or equal. Evaluates to
trueif the first operand is less than or equal to the second operand. Otherwise it evaluates tofalse. -
int > int -> boolean,float > float -> boolean -
Greater than. Evaluates to
trueif the first operand is strictly greater than the second operand. Otherwise it evaluates tofalse. -
int >= int -> boolean,float >= float -> boolean -
Greater or equal. Evaluates to
trueif the first operand is greater than or equal to the second operand. Otherwise it evaluates tofalse. -
any == any -> boolean -
Equals. Evaluates to
trueif the operands are equal. If one of the operands is anintand the other afloat, theintis first converted to afloatafter which thefloatvalues are tested for equality. -
any != any -> boolean -
Not equals. The result of
a != bis the same as the result of!(a == b). -
boolean && boolean -> boolean -
Logical AND. Evaluates to
trueif and only if both operands aretrue. -
boolean || boolean -> boolean` -
Logical OR. Evaluates to
trueif at least one operand istrue.
1.8. Program Structure
A general swift program has the following structure:
<importStatement>*

(<statement> | <functionDeclaration>)*
1.8.1. The Import Statement
The import statement can be used to bring definitions from an external Swift
source file into the current program. The syntax is:
import '"' <target> '"';where <target> is the path to a .swift file without extension.
For example:
import "/usr/local/swift/lib/constants";

import "../lib/functions";

import "defs";
If a relative path is specified as a target, Swift will attempt to resolve the
file using directory in which the current Swift script is running. If the
target is a plain file name, Swift will first look for the corresponding file
in the current directory. If no such file is found in the current directory,
Swift will attempt to find the file in directories specified using the
SWIFT_LIB environment variable. The SWIFT_LIB variable can contain one or
more directories separated by the system’s path separator character (":" in
Linux / OS X and ";" in Windows).
Example:
export SWIFT_LIB=${HOME}/swift/defs:${HOME}/swift/functions1.9. Functions
Functions represent code abstractions. They can have zero or more formal parameters (or formal input parameters) and zero or more formal return parameters (or formal output parameters).
1.9.1. Function Declarations
Functions are declared using the following syntax:
<formalOutputParams> <name> '(' <formalInputParams> ')' {
    <statements>
}

<formalOutputParams> := [ '(' <type> <name> (, <type> <name>)*  ')' ]

<formalInputParams> := [ <formalInputParam> (, <formalInputParam>)* ]

<formalInputParam> := <type> <name> [ = <primitiveValue>]
1.9.2. Function Invocation
A function is “applied” or used through a function invocation. When a function is invoked, a number of actual parameters is supplied. They must correspond to formal parameters in the function declaration. A function invocation has the following form:
[<actualOutputParams>] = <name>(<actualInputParams>);

<actualOutputParams> :=
    <lvalue> | '(' <actualOutputParam> (, <actualOutputParam>)* ')' ]

<actualOutputParam> := [<type>] <lvalue> [ = <name>]

<actualInputParams> := [ <positionalParams> , ] [ <keywordParams> ]

<positionalParams> := <expression> (, <expression>)*

<keywordParams> := <name> = <expression> (, <name> = <expression>)*
Alternatively, functions with a single return argument can be invoked as part of a function invocation expression:
<name> '(' <formalInputParams> ')'The following example shows a function definition and invocation:
(int result) add(int a, int b) {
    result = a + b;
}

int sum = add(1, 5);
Both output and input parameters are optional. The following example declares and invokes a function with no output parameters:
printMessage(string msg) {
    trace("Message: ", msg);
}

printMessage("Hello world!");
Correspondingly, the following example declares and invokes a function with no input parameters:
(int result) one() {
    result = 1;
}

int n = one();
As hinted by the function declaration syntax, input parameters can have a default value, in which case they become optional parameters. Optional parameters can be omitted when a function is invoked, in which case they assume the default value specified in the function declaration. If specified, an optional argument must be passed as a keyword actual parameter. Keyword parameters are said to be passed by name.
Example:
(int result) increment(int n, int amount = 1) {
    result = n + amount;
}

int a = 10;
int b = increment(a);
int c = increment(a, amount = 2);
the default value for amount is used, so b will be 11
| |
c will be 12
|
1.9.3. Parameter Binding
The are a number of rules that govern the binding of actual parameters to formal parameters. If a function has more than one formal output parameter, then the binding can be done either positionally or by name, but the two cannot be mixed. If parameters are passed by name, the order in which actual output parameters are specified can be arbitrary. The following example illustrates both options:
(int a, int b, int c) f() {
    a = 1;
    b = 2;
    c = 3;
}

// positional binding
int a1, b1, c1;
(a1, b1, c1) = f();

// keyword binding
int a2, b2, c2;
(c2 = c, b2 = b, a2 = a) = f();
Additionally, actual output parameters can be declared as part of the function invocation:
(int a3, int b3, int c3) = f();As seen previous, input parameters can also be passed possitionally or by name. In particular, optional parameters must always be passed by name. The two method can be mixed with the following restriction: parameters passed positionally must be specified first. In other words, no positional parameters are allowed after a keyword parameter. As is the case with named output parameters, the order in which named input parameters are passed is not relevant.
Example:
(int result) addFour(int a, int b, int c, int d = 1) {
    result = a + b + c + d;
}

int r1 = addFour(d = 4, c = 3, b = 2, a = 1);

int r2 = addFour(1, 2, d = 4, c = 3);
By contrast, the following invocations of addFour are illegal:
int r3 = addFour(1, 2, 3, 4);

int r4 = addFour(a = 1, 2, 3, d = 4);
Illegal: parameter d is optional and must be passed by name
| |
| Illegal: positional parameters follow a named parameter |
1.9.4. Application Functions
Application functions are a mechanism to give command-line applications the appearence of a Swift function. This allows a Swift program to invoke a command line application as if it were a normal Swift function. Application functions are declared as follows:
app <formalOutputParams> <name> '(' <formalInputParams> ')' {
    <applicationName> <commandLineArgument>* <redirectSpecification>*;
}

<applicationName> := <identifier> | <stringLiteral>

<commanLineArgument> := <expression>

<redirectSpecification> := (stdout | stderr | stdin) = <expression>
The formal parameters have the same form as in the case of normal function declarations.
The <applicationName> can either be a string naming a path to an executable
(or just an executable), or an identifier that will be
resolved by the Swift run-time to an
executable.
The expressions for the command line arguments must evaluate to primitive values, which will be converted by Swift to strings and passed as the application’s command line.
The expressions for standard stream redirects must be of type string and name
files in/from which the applications' streams will be redirected.
Example:
app (file outf) sort(file inf, int field) {
    sort "-k" filename(inf) stdout = filename(outf);
}|
|
See also: Application Functions Execution |
1.10. Statements
Statements in Swift are entities that express relationships between data.
1.10.1. Assignment Statement
The assignment statement associates a declared variable or structure member of a declared variable or an array item of a declared variable with the result of an expression (“expression” may sound fancy, but it includes primitive literals). The syntax for the assignment statement is:
<lvalue> = <expression>;

<lvalue> := <variable> (<arrayIndexAccessor> | <structFieldAccessor>)*

<arrayIndexAccessor> := '[' <index> ']'

<structFieldAccessor> := '.' <fieldName>
LValues
Examples:
int a, b, c;
int[] v;

a = 1;
b = a + 2;
c = abs(-b);
v[1] = a;
v[2] = b;
1.10.2. Append Statement
<array> '<<' <expression>;Example:
int[auto] a;

a << 1;
a << 2;
a << 4;
1.10.3. If Statement
The if statement allows the expression of conditional data relationships based on the value of some arbitrary boolean expression. The syntax is:
<ifStatement> :=
    if '(' <booleanExpression> ')' <thenBlock>
    [
        (else <elseBlock>)
        |
        (else <ifStatement>)
    ]

<thenBlock> := <statementBlock>;

<elseBlock> := <statementBlock>;

<statementBlock> := { <statement>* }
If <booleanExpression> evaluates to true, then <thenBlock> takes effect.
If <booleanExpression> evaluates to false, then there are two choices,
depending on whether an the exact form of the else part:
-
elseis followed by an<ifStatement> -
the nested if statement is evaluated
-
elseis followed by<elseBlock> -
<elseBlock>takes effect. -
no
elsepart is specified -
the effect of the overall
ifstatement is the same as if no statement was present at all.
Example:
int x = ...;
int step, sign;

if (x >= 0) {
    step = 1;
}
else {
    step = 0;
}

if (x > 0) {
    sign = 1;
}
else if (x < 0) {
    sign = -1;
}
else {
    sign = 0;
}
1.10.4. Switch Statement
The switch statement is a convenient way of expressing conditional relationships based on multiple possible values of an expression. The syntax is:
switch '(' <expression> ')' {
    ( <case> | <default> )*
}

<case> :=
    case <caseExpression>: <caseStatements>

<default> :=
    default: <statements>

<caseExpression> := <expression>

<caseStatements> := <statements>
The switch statement tests the value of the expression successively against
<caseExpression>. Once a match is found, the corresponding <caseStatements>
are evaluated. If none of <caseExpression> are equal to the switch expression,
and if a <default> is present, the statements corresponding to <default> are
evaluated.
If two or more case expressions evaluate to the same value, and if the switch expression is equal to that value, only the statements for the first case will be evaluated.
1.10.5. Foreach Statement
The foreach statement allows parametrization of statements based on the values (and optionally keys) of an array:
foreach <valueVariable> [, <indexVariable>] in <expression> {
    <statements>
}
The <expression> must be of array type. The foreach
statement evaluates the contained <statements> for each value stored in the
array. At each evaluation the value is bound to the <valueVariable>. If a
<indexVariable> is also specified, the corresponding array index will be bound
to it. The types of <valueVariable> and <indexVariable> are automatically
inferred by the Swift compiler from the type of <expression> and they do not
need to be declared separately. By default, foreach parallelizes the
evaluation of <statements> as much as possible. For details about that, see
Arrays and Iterations.
Here is an example foreach statement without an index variable:
int[] squares;

foreach x in [0:16] {
    squares[x] = x * x;
}
And one which does use the index variable:
int[] a = ...;
int[] b;

foreach value, index in a {
    b[index] = value;
}
1.10.6. Iterate Statement
The iterate statement can be used to implement convergence algorithms in
which a set of statements is evaluated repeatedly until a certain condition
is met. A counter is provided to distinguish between the evaluation steps. The
iterate statement has the following form:
iterate <indexVariable> {
    <statements>
} until '(' <expression> ')';
The <indexVariable> is an integer typed variable and it does not need to be
declared separately. Its initial value is 0. The <expression> must evaluate
to a boolean value. The iterate statement performs the following steps:
-
Initialize
<indexVariable>to0 -
Evaluate
<statements> -
Increment
<indexVariable> -
Evaluate
<expression>. If it istrue,iteratecompletes. -
Go to step 2
Example:
vector b = ...;
vector[] a;
a[0] = initialGuess();

iterate i {
    vector nextGuess = computeNextVector(a[i], op(a[i]));
    a[i + 1] = nextGuess;
} until (error(b, op(nextGuess)) < 0.1);
The termination expression may depend on the index variable or variables
declared inside the body of iterate. However, the values of the latter will
reflect the values calculated as part of the last evaluation of the body, and
may not reflect the incremented value of the iteration variable. The following
example illustrates this issue:
iterate i {
    trace(i);
} until(i == 1);

iterate i {
    trace(i);
    int j = i;
} until(j == 1);
Will print 0
| |
Will print 0 and 1
|
In the first case, i starts as 0, the trace is evaluated (and prints a
0), then i is incremented to 1 and the termination condition is evaluated.
The termination condition will be true on the first evaluation.
By contrast, in the second case, during the first evaluation of the body, the
variable j is assigned the initial value of i, which is 0. The index
variable, i, is then incremented to 1. However, the termination expression
refers to j, whose last value is 0, and therefore it evaluates to false.
2. The Swift Library
The Swift runtime library consists of a collection of functions and mappers. There are two versions of the standard library:
- Version 1
-
This is currently the default library and nothing special needs to be done to use it. Version 1 of the library will be phased out in future versions of swift unless the following import statement is used:
import "stdlib.v1"; - Version 2
-
This is a more extensive library. It will become the default in future versions of Swift. It can be used with the current version by importing it explicitly:
import "stdlib.v2";
The mapper library is unaffected by the choice of standard library.
2.1. Standard Library V1
2.1.1. Summary
string regexp(string input, string pattern, string transform)Returns a string that is constructed by replacing the first occurrence of the
regular expression pattern in input by transform. The transform string
can contain references to capture groups in pattern. References are
be inserted in the replacement string by escaping it with a backslash: "\\$".
string strcat(any... s)Returns a string formed by concatenating all of the parameters. The parameters that are not already strings are converted to strings. Example:
string result = strcat("One", "Two", 3);
result is the string "OneTwo3"
|
string strcut(string input, string pattern)Matches the regular expression in pattern against input and returns the
first capture group that is not the full match. If the first capture group
has no match in input, strcut() returns an empty string. If pattern
does not define a capture group, strcut() returns an error.
int strstr(string input, string find)Returns the first index in input at which the string find appears. If
find does not appear in input, the result is -1.
string[] strsplit(string input, string pattern)Splits input around matches of the regular expression pattern and returns
the resulting array. If pattern cannot be found in input, strsplit()
returns an array of length one containing the entire string input.
Consecutive delimiters are not explicitly merged, but the regular expression
can contain quantifiers that control this behaviour.
string strjoin(any[] array, string delim)Returns a string formed by concatenating all elements in array with delim
inserted between consecutive elements of array. The items in array are
converted to strings before being concatenated.
string format(string format, any...)Formats the parameters according to format which must conform to the the
specification in
Java string formatter
and returns the resulting string.
string pad(int size, int value)Returns a zero-padded string representation of value. The number of digits
is controlled by the size parameter. If the string representation of value
naturally contains more than size characters, pad() returns that
representation without any padding. In other words, pad() returns a string
that has at least size characters, but possibly more.
string sprintf(string format, any...)Formats the parameters according to format which is a string allowing the
following format specifiers:
-
%%: the
%character. -
%M: Filename output: waits for close
-
%p: String representation of an arbitrary value.
-
%b: A
booleanvalue. -
%f: A
floatvalue. -
%i: An
intvalue. -
%s: A
stringvalue. -
%k: Parameter is sKipped; no output.
-
%q: Format an array.
2.2. Standard Library V2
2.2.1. Summary
For all the string functions, the indices are zero-based. That is, the first character in a string is located at index zero.
string strcat(any... s)Returns a string formed by concatenating all of the parameters. The parameters that are not already strings are converted to strings. Example:
string result = strcat("One", "Two", 3);
result is the string "OneTwo3"
|
int length(string s)Returns the number of characters in the string s
string[] split(string s, string delimiter)Splits the string s around delimiter. The delimiter is a plain string. If
the delimiter cannot be found in s, it returns an array with a single item
equal to s. Consecutive delimiters are merged (i.e. treated as a single
delimiter).
string[] split(string s, string delimiter, int maxSplit)Like split above, except that the splitting stops when the result reaches
maxSplit items, in which case the last item in the result will contain the
entire remaining part of s. If maxSplit is one or less, it returns an
array of size one with the sole item containing the entire string s.
string[] splitRe(string s, string regexp)Splits s around matches of the regular expression regexp and returns the
resulting array. If regexp cannot be found in s, splitRe returns an array
of length one containing the entire string s. Consecutive delimiters are not
explicitly merged, but the regular expression can contain quantifiers that
control this behaviour.
string[] splitRe(string s, string regexp, int maxSplit)Like splitRe above, except that the splitting stops when the result reaches
maxSplit items, in which case the last item in the result will contain the
entire remaining part of s. If maxSplit is one or less, it returns an
array of size one with the sole item containing the entire string s.
string trim(string s)Returns a copy of s with leading and trailing whitespace removed.
string substring(string s, int start)Returns a substring of s starting at index start (inclusive) and continuing
until the end of s. If start is negative or equal to or larger than the
length of s, substring returns an error.
string substring(string s, int start, int end)Returns a substring of s starting at index start (inclusive) and
ending at end (exclusive). If start or end are negative, the result is an
error. If start is greater or equal than end, the result is an error. If
end is greater or equal than the length of s, the result is an error.
string toUpper(string s)Returns a copy of s with all lower case characters replaced by the
corresponding upper case characters.
string toLower(string s)Returns a copy of s with all upper case characters replaced by the
corresponding lower case characters.
string join(string[] sa, string delimiter)Returns a string formed by concatenating all the items in the array sa in the
order of their indices, separaed by delimiter. If the length of sa is zero,
join returns an empty string.
string replaceAll(string s, string find, string replacement)Returns a string formed by replacing all occurrences of find in s with
replacement.
string replaceAll(string s, string find, string replacement, int start, int end)Returns a string formed by replacing all occurrences of find in s with
replacement. The searches are only performed in the region of s
contained between start (inclusive) and end (exclusive)
string replaceAllRe(string s, string findRe, string replacementRe)Returns a string formed by replacing all matches of findRe in s by
replacementRe. The replacementRe can contain references to capture groups
in findRe. References are introduced using the dollar sign ($) and can
etc.). A literal dollar sign can be inserted in the replacement string by
escaping it with a backslash: "\\$".
string replaceAllRe(string s, string findRe, string replacementRe, int start, int end)Like replaceAllRe above, except only search for findRe in the region of s
between start (inclusive) and end (exclusive).
int indexOf(string s, string find, int start)Searches for the first occurrence of find in s, starting at index start.
If find is not found in s, indexOf returns -1. If start is less than
zero or greater or equal to the length of s, an error is returned.
int indexOf(string s, string find, int start, int end)Searches for the first occurrence of find in a region of s starting at
index start (inclusive) and ending at index end (exclusive). If find is
not found in s, indexOf returns -1. If start or end are negative, the
result is an error. If start is greater or equal than end, the result is an
error. If end is greater or equal than the length of s, the result is an
error.
int lastIndexOf(string s, string find, int start)Searches backwards for the last occurrence of find in s starting at index
start (inclusive) and going backwards. If start is -1, lastIndexOf
starts searching at the end of the string. If the search string is not found,
lastIndexOf returns -1. If start is invalid (less than zero or equal to
or larger than the length of s), lastIndexOf returns an error.
int lastIndexOf(string s, string find, int start, int end)Searches backwards for the last occurrence of find in s starting at index
start (inclusive) and going backwards down to index end (exclusive). If
start is -1, lastIndexOf starts searching at the end of the string. If the
search string is not found in the search region, lastIndexOf returns -1. If
start or end are invalid (less than zero or equal to or larger than
the length of s) or if end is larger than or equal to start, lastIndexOf
returns an error.
boolean matches(string s, string re)Returns true if the string s matches the regular expression re.
string[] findAllRe(string s, string re)Returns all capture groups that result from the search of re in s in an
array. The first element of the array (with index zero) will contain the entire
matched string.
2.3. Mapper Library
2.3.1. Summary
![]()
![]()
<SingleFileMapper; string file>Maps a single physical file to a file-valued variable.
Parameters:
- file
-
A relative or absolute path or a URL specifying the file location.
Example:
file f <SingleFileMapper; file = "input.txt">;This is equivalent to:
file f <"input.txt">;
![]()
![]()
<SimpleMapper; string location = ".", string prefix = "", string suffix = "",
         string pattern = "*", int padding = 4, string separator = "_">
Allows mapping of variables of arbitrary types. The file names are detemined by concatenating the structure field names and array indices of a fully qualified leaf value. Given a variable of some arbitrary type, a particular leaf is referenced as:
<name> (<field> | <index>)*

<field> := '.' <fieldName>
<index> := '[' <indexValue> ']'
If the variable is mapped using the SimpleMapper, the file names will consist
of some prefix followed by the relevant sequence of <fieldName> or
<indexValue> separated by some separator and ending with a suffix.
For example, given the following Swift code:
type person {
    string name;
    file address;
    file data;
    int age;
}

person[] employees <SimpleMapper; prefix = "employee", separator = "-",
    suffix = ".txt">;
the mapping would be:
| Leaf | File |
|---|---|
employees[1].address |
"employee-0001-address.txt" |
employees[1].data |
"employee-0001-data.txt" |
employees[2].address |
"employee-0002-address.txt" |
employees[2].data |
"employee-0002-data.txt" |
Parameters:
-
location -
Represents a directory where the files are located.
-
prefix -
If specified, prepends a prefix to all file names mapped by this mapper
-
suffix -
If specified, appends a suffix to all file names mapped by this mapper
-
pattern -
When used as an input mapper, this parameter represents an extended glob pattern that can be used to restrict the files mapped by this mapper. The extended glob pattern recognizes the following special symbols:
-
? -
Matches a single character
-
* -
Matches any number of arbitrary characters within a single path element (directory name or file name)
-
** -
Recursively matches all sub-directories
-
-
padding -
The minimum number of characters to use for integer indices. All index values whose string representation have fewer characters than the value of
paddingwill be zero-padded -
separator -
A string used to separate consecutive field names or index values
If the SimpleMapper is used to map arrays whose indices are not integers, an
unspecified string representation will be used for the portions of the file
names corresponding to the non-integer indices.
![]()
![]()
<FixedArrayMapper; string[] files>Maps an array of file-valued items and integer keys using a list of files. The
array must not be sparse and the first index is zero. Using the
FixedArrayMapper closes the array (but not its items) and fixes its length.
![]()
![]()
<FixedArrayMapper; string files>Similar to FixedArrayMapper above, except the files are specified as a
comma-separated list (with optional whitespace) of files. Example:
file[] texts <FixedArrayMapper; files = "file1.txt, fileB.txt, file3.txt">;
![]()
<FilesysMapper; string location = ".", string prefix = "", string suffix = "",
         string pattern = "*">
Maps an array of file-valued items and integer keys using a set of files
obtained from the filesystem. FilesysMapper searches for files in a location
based on a certain suffix, prefix and extended glob pattern an assigns the
resulting list of files to the array starting at index zero.
Parameters:
-
location -
Represents a directory where the files are located.
-
prefix -
If specified, only include files that have this prefix.
-
suffix -
If specified, only include files that have this suffix.
-
pattern -
An extended glob pattern used to filter the files. The extended glob pattern recognizes the following special symbols:
-
? -
Matches a single character
-
* -
Matches any number of arbitrary characters within a single path element (directory name or file name)
-
** -
Recursively matches all sub-directories
-
![]()
<RegexpMapper; string source, string match, string transform>Uses a regular expression substitution to create a mapping from an existing one.
The value of source is transformed using the regular expression substitution
and the result is used to map a single file value.
Parameters:
-
source -
A string (presumably representing an existing path)
-
match -
A regular expression
-
transform -
A string that can contain references to capture groups in the regular expression specified using the
matchparameter. The capture group references are in the form\\[0-9]
Example:
file s <"picture.gif">;
file f <RegexpMapper; source = filename(s), match="(.*)gif",
    transform="\\1jpg">;
![]()
![]()
<StructuredRegexpMapper; any source, string match, string transform>An extension of RegexpMapper that can be used for
both single file values and complex types.
Parameters:
-
source -
Can either be a
string, in which caseStructuredRegexpMapperwill behave as a RegexpMapper, or a an array with items being either strings or file valued types, in which caseStructuredRegexpMapperwill apply the regular expression substitution to every item or the corresponding path that the item is mapped to. -
match -
A regular expression
-
transform -
A string that can contain references to capture groups in the regular expression specified using the
matchparameter. The capture group references are in the form\\[0-9]
Example:
file[] a <SimpleMapper; location = ".", prefix = "img", suffix = ".gif">;

file[] b <StructuredRegexpMapper; source = a, match="(.*)gif",
    transform="\\1jpg">;
![]()
![]()
<CSVMapper; any file, boolean header = true, int skip = 0, string hdelim = " \t,", string delim = " \t,">The CSVMapper allows mapping of arrays of structures according to a file
formatted using a custom CSV-like format. The lines in the file correspond
to items in the array (starting at index zero) and the columns corerspond
to structure fields. A header in the CSV file can be used to specify the
structure field names.
Parameters:
-
file -
Can be a
stringcontaining the path name of the CSV file or a file-value that maps to the CSV file from which the data is read. -
header -
If set to
true, it indicates that the first line in the CSV file contains the names of the structure fields that are being mapped. If set tofalse, theCSVMapperassumes that the structure fields are named"column1","column2", etc. -
skip -
A value indicating an amount of lines to skip in the beginning of the CSV file. If
headeris set totruethe lines are skipped after reading the header. -
hdelim -
A set of characters that delimit header coulmns. Any of the characters are considered delimiters and they can be mixed. For example, if
hdelimis set to",;", then both of the following headers are valid and yield the same result:"colname1,colname2,colname3","colname1;colname2,colname3". -
delim -
Like
hdelim, except it applies to data lines.
![]()
![]()
<ArrayMapper; file[] files>TODO: There seems to be no difference between this and FixedArrayMapper.
![]()
![]()
<Ext; string exec, *>The Ext+ernal mapper invokes a sub-process to obtain mappings for arbitrary
types. The output from the process must be formatted as field file name pairs separated by whitespace. The field is the qualifying part of an
lvalue with array keys restricted to +int, float or
string primitive literals. If there is no qualifying part, such as when
reading the mapping for a non-composite file type, the field must be
the dollar sign ($). The file names are strings without quotes.
Parameters:
-
exec -
A path to an executable that will print, on its standard output stream, the mappings according to the format specified above.
-
* -
Any other parameters to the
Extmapper will be passed to the mapping executable in the form-<parameterName> <value>.
Example:
file[] array <Ext; exec = "mapper.sh", suffix = ".txt">;#!/bin/bash
SUFFIX=
if [ "$1" == "-suffix" ]; then
SUFFIX=$2
else
echo "Invalid parameter: $1"
exit 1
fi
echo "[0] array-0000$SUFFIX"
echo "[1] array-0001$SUFFIX"
echo "[2] array-0002$SUFFIX"
![]()
![]()
<ConcurrentMapper; string prefix, string suffix, string pattern, string location>The concurrent mapper is an extension to the SimpleMapper that guarantees unique mappings for all variables declared in the same program, but does not specify exactly what the form of the mapping is.
3. The Swift Runtime
Swift is a deterministic dataflow language. The lexical ordering of statements is generally irrelevant. What is relevant are the dependencies between data.
3.1. Values as Futures
Each value in Swift is a future. A future wraps a concrete value and has two possible states:
- Open
-
(or unbound). This is the default initial state of a value. The concrete value is absent and cannot yet be used in a concrete operation. It will be available at a later time.
- Closed
-
(or bound). This is a state in which a concrete value is available and can be used in an operation.
If a value is open at some time, it can be closed only at a later time. It is not possible for a variable to become open after it was closed.
Value literals are represented with futures that are closed when a program starts execution.
3.2. Order of Operations
Independent operations in Swift are all executed in parallel. However, operations can depend on values which must be closed before the respective operations can be executed. Consider the following example:
int a = 1;
int b = 2;

int c = f(a) + g(b);
The following operations can be identified:
-
three assignments, for variables
a,bandc -
two function invocations:
f(a)andg(b) -
an addition operation
All these operations are started in parallel as soon as Swift starts running the
program. The assignments to variables a and b can continue immediately since
they depend only on integer literals, which are closed by default. The
invocations of f and g can then continue. The addition has to wait for the
results from the invocations of both f and g. When those results are
available, the addition can be peformed and the resulting value can be finally
assigned to c.
3.3. Types of Operations
Technically speaking, many things can be considered “operations”. However, it is worth emphasizing some of them due to the particular way in which they are executed.
- Assignments
-
The assignment statement waits for the right hand side to be closed, copies the concrete value from the right hand side to the left hand side, and finally closes the left hand side.
|
|
See also: assignment of mapped values |
- Application Functions
-
An application instance will only run after all of its actual parameters are closed. After an application invocation completes, all the actual return parameters are closed by Swift.
- Function Invocations
-
When a non-application function is invoked, it does not necessarily wait for all of its actual parameters to be closed. The details depend on the actual definition of the function. Consider the following example:
(int result) product(int f1, int f2) {
    if (f1 == 0) {
        result = 0;
    }
    else {
        result = f1 * f2;
    }
}

int r1 = product(0, x);
int r2 = product(2, x);
Two cases exist:
-
In the first invocation of the
productfunction, the parameterf1is zero. The first branch of theifcondition is taken, which does not include an operation that waits for the value off2to be closed. -
In the second invocation, the value of
f1is non-zero. The second branch of theifis taken. This branch contains an operator that has the values of bothf1andf2as parameters. In this case theproductfunction needs to wait forf2to be closed before producing a result.
For functions defined in the Swift standard library, it is implied that the implementation will always wait for the value of the parameters to be closed. Any exceptions to this rule are explicitly documented.
-
- Operators
-
There is no semantic difference between operator invocations and library function invocations, so the above rule applies. In particular, the current implementation does not implement shortcut evaluation for boolean operators.
3.4. Arrays and Iterations
Arrays in Swift are sparse. This means that array sizes, in general, can only be fully determined at run-time. Because of this, the array structure itself has the properties of a future. Consider the following example:
int[] a, b;

a[0] = 1;

iterate i {
    int value = someComplexFunction(i);
    a[i + 1] = value;
} until (value > 100);

foreach x, i in a {
    b[i] = f(x);
}
Since iterate and foreach run in parallel, the foreach will start before
a is fully constructed. We assume that the iterate condition
eventually becomes true. In order for the program to terminate and
function deterministically, the foreach must eventually terminate and it must
not do so before all the items have been added to a. Arrays must therefore
have two states:
- Open array
-
In this state it is unknown whether more items will be added to an array or not.
- Closed array
-
Both the size of the array and the indices corresponding to all the items in the array are known.
A foreach statement will start, in parallel, an iteration for each item
available in an array. As more items are added to the array, foreach will
start the corresponding iterations. When the array becomes closed and all
iterations complete, foreach will complete.
3.4.1. When are Arrays Closed
The determination of when an array can be closed is made based on analyzing all
source code locations in which that array is written to. In the last example
above, all writing operations to a are done within the iterate statement.
The Swift compiler will generate code to close a as soon as the iterate
statement completes.
3.4.2. Writing to an Array that is Being Iterated on
Swift allows writing to an array that is being iterated on using the foreach
statement:
int[] a;

a[0] = 1;

foreach x, i in a {
    int value = someComplexFunction(i);
    if (value <= 100) {
        a[i + 1] = value;
    }
}
Swift handles array closing slightly differently in the case of
“self referencing” foreach statements. The a array will be closed when
both the following conditions are true:
-
All writing operations to
aoutside of theforeachhave completed -
Iterations for all available items in
ahave completed
This can be used to implement everything that can be implemented using the
iterate statement, possibly in a more clear fashion. Users are encouraged
to use foreach instead of iterate.
3.5. Circular Dependencies
Circular dependencies are situations in which two or more values form a dependency cycle through operations applied on them. The simplest case is that of two mutually dependent values:
int a, b;

a = f(b);
b = f(a);
The variable a cannot be closed until b is closed which in turn cannot be
closed until a is closed. Situations like this will cause a Swift program
to stop progressing. This is detected by the Swift run-time and results in a
run-time error.
While the above situation can theoretically be detected at compile-time, this cannot be done in all cases. Consider the following example:
int[] a;

a[0] = 1;

a[1] = a[getIndex(1)];
a[2] = a[getIndex(2)];
It is possible, but not necessary, that at run-time the above code will result in:
int[] a;

a[0] = 1;

a[1] = a[2];
a[2] = a[1];
This can only be determined by knowing the values returned by the
getIndex() function, which in general can only be done at run-time.
3.6. Error Handling
TODO
3.7. File Mapping
File mapping is the process through which values stored in Swift variables of mapped types are associated with physical files. This process is implemented by mappers which are specified using mapping declarations. A non-composite mapped value can be associated to a file using the SingleFileMapper or its short form:
file f <"file.dat">;The above code associates the variable f to a local file named file.dat
which is assumed to be in the directory from which Swift is invoked. It is
possible to more complex path names or even URLs to associate a Swift variable
with files that do not necessarily reside in the current directory:
file f1 <"/tmp/file.dat">;

file f2 <"http://example.org/index.html">;
For a list of all supported remote file access methods, please see Filesystem Providers.
Values of composite types containing file-valued data can be mapped in bulk using one of the additional mappers provided by Swift. For example, the FilesysMapper can be used to glob files in a directory and map them to an entire array:
file[] a <FilesysMapper; location = ".", pattern = "*.dat">;3.7.1. Implicit Mapping
A mapped type value that is not mapped explicitly is implicitly mapped. Specifically Swift will map it to a deterministic but opaque temporary file.
3.7.2. Input or Output
Swift distinguishes between input and output mapped data based on whether explicit assignments are present in the program. If a variable is assigned to in a Swift program, Swift considers that variable to be an output. Otherwise, Swift marks it as an input. When a variable is marked as an input, Swift requires that the corresponding files be present, unless the variable is an array that can be empty. An input mapped variable is considered to be implicitly assigned. Example:
file f <"input.dat">;
file g <"output.dat">;

g = cat(f);
Variable f is not explicitly assigned to. It is therefore an input
variable, and Swift implicitly assigns a file value representing the input.dat
file to it. It is an error for input.dat not to exist as a file.
| |
Variable g is explicitly assigned to. It is therefore an output and it
will be created by Swift during the program’s execution.
|
It does not make sense for certain mappers to be used for output (such as the FilesysMapper), since their operation depends on having a set of physical files present.
3.7.3. Assignment of Mapped Values
When a mapped value is assigned to a mapped type variable, and the destination variable is not implicitly mapped, Swift guarantees that the file that the destination variable is mapped to will exist. This is generally done by copying the file. However, Swift may optimize this when possible, in particular by creating symbolic links on systems that support it.
3.8. Application Functions Execution
Applications in Swift are generally executed on remote computing resources. In the Swift language, applications functions are specified in a way that is independent of where and how applications are run, which allows application instances to be scheduled efficiently based on resource availability. When an application function is invoked, the following steps are taken:
-
Swift waits for all the actual parameters to the application function to be closed
-
Site selection: a remote resource is selected from all available resources based on whether they contain the given application, load, and other run-time information (see Section on Site Selection).
-
A file sandbox is created, where the application input and output files will be stored
-
All files corresponding to mapped values in the actual parameters are copied to the application sandbox ("stage-in")
-
The application is executed remotely using one of the available execution mechanisms
-
All files corresponding to mapped values in the actual return parameters are copied back from the application sandbox, and the actual return parameters are closed ("stage-out")
-
The application sandbox is deleted
The application execution is performed indirectly. A small script, called
"wrapper" (or _swiftwrap), is used to implement the following functions:
-
set up the details of the application sandbox, such as directory structures where input and output files go
-
perform basic tests of the environment and try to generate user-friendly error messages if something is wrong
-
copy or link files from a resource-local swift cache to the application sandbox and back
-
optionally clean up the application sandbox
-
record the status of the application execution
-
log various application timing information
There are three ways in which the above operations can be performed and they will be explained in detail in the following sections: swift staging, provider staging, and wrapper staging.
3.8.1. Swift Staging
Swift staging is historically the first mechanism used by Swift to deal with
remote application files. In swift staging mode (selected through the
staging: "swift" configuration option), for each
job, the Swift runtime selects a site as described in
Site Selection, and, using that site, it performs
the following operations in order:
-
Using the filesystem provider specified in the configuration file, it creates a shared directory in the location specified by the
workDirectorysite property that will mirror the local directory structure with respect to all files used by applications running on that site. This directory is only created once per site per swift program execution, and it is initially empty. It is guaranteed that two invocations of swift programs will have different shared directories on a given site. -
In the shared directory, Swift creates the directory structure needed by the job’s input and output files. For example, if an application uses the following input:
file f <"data/f.dat">;then Swift will create a directory named
datainside the site shared directory. -
Using the filesystem provider, swift copies all the application’s input files into their respective directories inside the shared directory. Files that are already in the shared directory are skipped.
-
The application is invoked through
_swiftwrap. The essential steps taken by_swiftwrapin Swift staging mode are as follows:-
Create a sandbox directory either inside the shared directory, or in a temporary location if the
scratchproperty is specified for the site -
For each of the application’s input files, either copy the file from the shared directory into the sandbox directory or create a symbolic link inside the sandbox directory to the file in the shared directory. The choice of whether to copy or link is determined by existence of the
scratchproperty. If the property is defined for the site, then the files will be copied. The copying process preserves the directory structure. -
Run the application
-
If the application returns a zero exit code indicating success, then:
-
Check that all the output files were created by the application and fail if not
-
Move the output files from the sandbox directory back to the shared directory preserving the directory structure
-
Remove the job directory
-
-
Exit signalling success or failure; the exact method of signalling depends on the value of the
statusModeproperty. If set toprovider, then_swiftwrapexits with an exit code equal to the exit code of the application. If set tofiles, then swift creates either an empty success file or a failure file containing the application exit code
-
-
Transfer and check the status files for the job status if
statusModeisfiles -
Copy all application output files back to the machine that Swift is running on
For example, consider the following Swift program:
app (file outf) cat(file inf) {
    "/bin/cat" filename(inf) stdout = filename(outf);
}

file inf <"inputs/a.dat">;
file outf <"outputs/b.dat">;

outf = cat(inf);
and the following configuration:
site.cluster {
    execution {
        type: "GRAM"
        url: "login.cluster.example.org"
        jobManager: "PBS"
    }

    filesystem {
        type: "GSIFTP"
        url: "login.cluster.example.org"
    }

    statusMode: "provider"
    staging: "swift"
    workDirectory: "/homes/johndoe/swiftwork"
}

sites: [cluster]
Swift would execute the cat application as follows:

A few observations are in order:
-
statusMode: "files"was historically used to deal with execution providers that did not have a mechanism of reporting the application exit code. The most notable example is the early implementation of the GRAM protocol from the Globus Toolkit version 2. It is unlikely to be needed. -
when running on compute clusters, the shared directory and therefore the work directory needs to reside on a shared filesystem that is accessible from the compute nodes.
-
transfers and other file operations are all controlled directly by Swift and are governed by throttling settings, such as
fileTransfersThrottleandfileOperationsThrottle. Throttling limits the number of concurrent operations and is useful to increase stability without affecting performance. -
use of a
scratchoption pointing to a compute-node local filesystem can yield better performance if the work directory resides on a shared filesystem that has high latencies and high throughput. The performance improvement also depends on how the application accesses its input files and is more noticeable if the application uses a random-access pattern on its input files rather than sequential reads. -
while Swift staging is mostly superseded by provider staging through Coasters, there are still legitimate reasons to use Swift staging, such as running MPI applications through GRAM and a local resource manager (e.g. PBS).
3.8.2. Provider Staging
With provider staging, Swift delegates the task of transferring files to the compute nodes to the execution provider. The full functionality needed to manage all the file operations needed by a job are currently only supported by the Coasters execution provider, so provider staging requires the use of Coasters.
Since the provider takes care of shipping files to the compute nodes, there is no strict need for a shared filesystem on the cluster except as needed by Coasters. Files on the Swift side, as well as the job sandboxes, can reside on directly-attached disks. This can improve performance with respect to shared filesystems that would have non-trivial latencies.
Wrapper staging is enabled by specifying one of local, service-local,
shared-fs or direct choices to the staging
site configuration property. The meaning of the various choices is as follows:
-
local -
files are assumed to reside on the machine where Swift is running. Coasters will copy the files using the Coaster Service as a proxy. This allows files to be copied even if the compute nodes cannot reach networks outside of the cluster they belong to.
-
service-local -
files are assumed to reside on the machine where Swift is running and the Coaster Service is assumed to be running on the same machine.
-
shared-fs -
files are assumed to reside on a shared filesystem that is accessible by the compute nodes and are copied using standard POSIX copying routines.
-
direct -
this is an experimental mode similar to
shared-fsin which no copying to a sandbox is actually done. Instead, applications are passed the absolute paths to the files involved.
Using the same example application as in the case of Swift staging, an example
set of operations performed by Swift with staging: local is shown below:

3.8.3. Wrapper Staging
Wrapper staging is an experimental feature that allows _swiftwrap to perform
the necessary file staging operations. It generally requires a shared
filesystem accessible from the compute nodes.
3.9. Data flow and staging
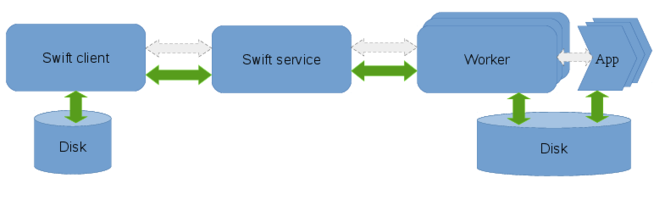
3.9.1. Overview
The execution components involved in a Swift workflow are the client, the swift service and the workers. The client is the program that executes the workflow described in a swift script and is invoked by the swift command. The service may be started separately or automatically by the swift client and is responsible for provisioning resources from clouds, clusters or HPC systems. The workers are launched by the swift-service and are responsible for controlling the execution of the user’s application on the compute nodes.
Different clusters, HPC systems, and cloud vendors may have shared file-systems, varying network characteristics and local-disks available which can be utilized differently to marshal data efficiently within a workflow. Data flow refers to this movement of data within a workflow. On distributed systems with varying levels of shared resources, the Swift client and service coordinates the flow of data among the worker-nodes such that the data required for computation is available to the worker prior to the execution of the users’s application as well as ensuring that the computed results are captured once tasks run to completion.
There are 6 different staging methods that are supported by Swift. They are:
-
Local
-
Direct
-
Wrapper
-
Swift
-
Shared-fs
-
Service-local
These staging methods are explained in detail in the following sections.
Legend for the following sections:
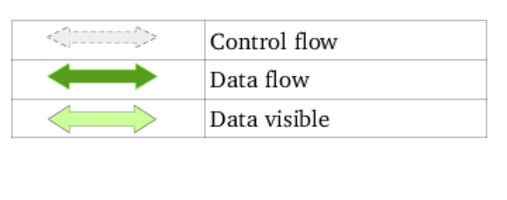
3.9.2. Staging method : local
Data flow in local staging:
Summary
The local staging method is designed for shared-nothing architectures such as clusters and clouds with no shared file-systems. The data originates on the node where the client runs and all data transfers are done explicity over the network. This method avoids using a shared-filesystem to transfer the files over the network, as in many cases the shared-filesystem is a shared among multiple users which adds congestion and it also could just be unsuitable for certain file access patterns. The client and service need not be on the same machine, which allows a client running on a local workstation to channel data through a service on the headnode of a Cluster1 to compute nodes provisioned from Cluster1. The is the default file staging method as this works on all computational resources. Since all the data is transferred via the swift-service the network bandwidth of the service could bottleneck the data flow. Similarly if the swift client is running remotely, the network links between the client and the service could potentially become a bottleneck for large volumes of data.
When to use this mode
The data volumes that need to be transferred to and from the workers to the client per worker are not more that hundreds of MB. As data sizes approach GBs of data per task, other transport mechanisms such as Globus transfers are worth considering.
When each task either consumes or generates a large number of small files, shared-filesystem based copies can be very slow. The local staging method is an ideal candidate for this scenario. However, when there are large number of files involved the filesystem of the system on which the client is executing could become a bottleneck. Using a faster non-disk filesystem when available generally improves performance significantly.
Example configs
sites: midway
site.midway {
    execution {
        type: "coaster"
        URL: "swift.rcc.uchicago.edu"
        jobManager: "ssh-cl:slurm"  # Client connects remotely to the login node.
        options {
            nodeGranularity: 1
            maxNodesPerJob: 1
            jobQueue: "sandyb"
            maxJobs: 1
            tasksPerNode: 1
            maxJobTime: "00:08:20"
        }
    }
    staging: "local"
    workDirectory: "/tmp/"${env.USER}
    app.date {
        executable: "/bin/date"
        maxWallTime: "00:05:00"
    }
}
Performance
All data-flow is over the network links from the client node and service node in this staging method and as a result, the network capacity of the client node is a potential limiting factor for large data volumes.
When several small files are involved, or with sufficiently large files, the filesystem on the client node can become a bottleneck.
There are performance limitations to the the staging/transport mechanism that swift uses, which could limit transfer throughputs. [TODO: Data to support this would be very nice]
Notes:
When running using local coasters (local instead of ssh-cl), the client and service run on the same node. In this case, the network links are between the service and workers.
3.9.3. Staging method : Direct
Data flow with Direct staging:
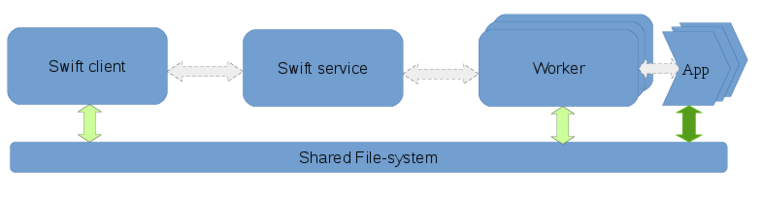
Data flow with Direct staging and a scratch directory:

Summary
The direct staging mode is designed for computational resources with High-Performance shared-filesystems. This mode requires that a shared filesystem such as NFS, Lustre, or even FUSE-mounted-S3 is mounted across the nodes where the client, service, and the workers are executing. Instead of Swift managing network transfers, the network transfers are implicitly managed by the shared-filesystem. The apps run in sandbox directories created under the workDirectory, but the tasks themselves will receive absolute paths for the input and output files. For applications that are IO bound, writing directly to the shared-filesystem can adversely affect the shared filesystem performance. To avoid this there is an option to specify a “scratch” folder on a local disk on the compute nodes.
When to use this mode
Large volumes of data are either consumed or generated by the application and a High Performance shared-filesystem is available across the nodes. On systems which have shared-filesystems, with I/O bandwidth that exceeds the network links between the headnode and the worker nodes, using the network to transfer data to the compute nodes could be sub-optimal.
When a high-performance shared filesystem is available, such as the case on many supercomputing systems, there is sufficient I/O bandwidth to support several applications reading and writing to the filesystem in parallel.
Another scenario is when the shared-filesystem is sensitive to creation and deletion of small files and directories. The swift workers create a sandbox directory for each task, which is (3 : TODO:confirm this with Mihael) levels deep. Using the direct mode with the workDirectory on a local disk (say /tmp) could avoid the overhead from swift’s mechanisms for sandboxing tasks.
Example configs
The following is an example for the direct staging mode. * Staging method is set to “direct”. * workDirectory may be set to the shared filesystem or a local filesystem.
In this case, Swift assumes that file variables point at files on the shared filesystem. The apps which are executed on the workers resolve the file variables to absolute paths to the input and output files on the shared-filesystem.
sites: midway

site.midway {
    execution {
        type: "coaster"
        URL: "swift.rcc.uchicago.edu"
        jobManager: "local:slurm"
        options {
            nodeGranularity: 1
            maxNodesPerJob: 1
            jobQueue: "sandyb"
            maxJobs: 1
            tasksPerNode: 1
            maxJobTime: "00:08:20"
        }
    }
    staging: direct
    workDirectory: "/tmp/"${env.USER}"/swiftwork"
    app.bash {
        executable: "/bin/bash"
        maxWallTime: "00:05:00"
    }
}
The following is an example for the direct staging mode.
-
Staging method is set to “direct”
-
workDirectory may be set to the shared filesystem or a local filesystem.
-
Scratch is set to a directory on the local disks of the workers.
Since the staging method is set to “direct”, swift will assume that file are on a shared file-system. In the context of user-application the file variables will resolve to absolute paths of the input/output files on the scratch directory. Before the workers start the execution of user tasks, the workers will copy the input files from the shared-filesystem to the scratch directory, and after execution will copy out the output files from the scratch directory to the shared-filesystem.
sites: midway

site.midway {
    execution {
        type: "coaster"
        URL: "swift.rcc.uchicago.edu"
        jobManager: "local:slurm"
        options {
            nodeGranularity: 1
            maxNodesPerJob: 1
            jobQueue: "sandyb"
            maxJobs: 1
            tasksPerNode: 1
            maxJobTime: "00:08:20"
        }
    }
    staging: direct
    workDirectory: "/tmp/"${env.USER}"/swiftwork"
    scratch: "/scratch/local/"${env.USER}"/work/"
    app.bash {
        executable: "/bin/bash"
        maxWallTime: "00:05:00"
    }
}

TCPPortRange: "50000,51000"
lazyErrors: false
executionRetries: 0
keepSiteDir: true
providerStagingPinSwiftFiles: false
alwaysTransferWrapperLog: true
Notes:
TODO : Details of the filename behavior in apps and within swiftscript body.
When this configuration is used, the worker copies the input files from the shared-filesystem to the scratch directory, and the user application will get the path to the file on scratch when the filename(<file_variable>) and it’s shorthand @<file_variable> primitives are used in the app definition. The filename and @ primitives when used outside of the app definitions will point at the files on the shared-filesystem.
Performance
"Direct" is theoretically the optimal way to use the shared-filesystem. There are no unnecessary copies, and the application that requires the file alone access the data.
If the data access pattern of the application involves random seeks or creation of several intermediate small files, the "scratch" option allows you to offload sub-optimal file access patterns to a local disk/memory. This avoids costly accesses on the shared-filesystem and indirectly the network.
3.9.4. Staging method : Swift
Data flow with staging method Swift:
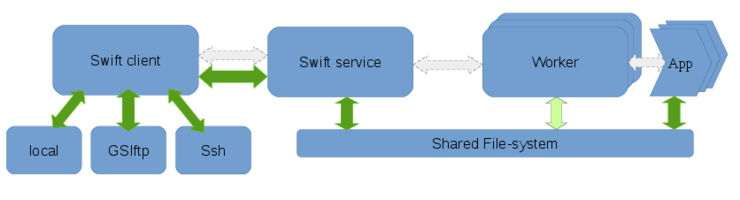
Summary
Swift staging, involves the client accessing file over a supported method like ssh or a local-filesystem access, and making the inputs available to the workers over a work-directory on a shared filesystem. This staging method uses an intermediate staging location that is on a shared-FS so each files is, in addition to being read from the initial location, written to and read from a shared FS, both of each are overhead. The only advantage to this is that you don’t need coasters to use it and it’s supported on a large number of computational resources.
This is the default staging mechanism used if no staging method is defined in the swift config file.
When to use this mode
-
You can access data using one of the supported methods like: local filesystem access ssh - Use scp to access files GSIFTP GridFTP
-
A shared-FS is present, that works well for your data access patterns.
-
You want to use a non-coaster execution provider.
The GSIFTP and GridFTP are not actively tested, and are not guaranteed to work.
Example configs
sites: midway

site.midway {
    execution {
        type: "coaster"
        URL: "swift.rcc.uchicago.edu"
        jobManager: "local:slurm"
        options {
            nodeGranularity: 1
            maxNodesPerJob: 1
            jobQueue: "sandyb"
            maxJobs: 1
            tasksPerNode: 1
            maxJobTime: "00:08:20"
        }
    }
    filesystem {
        type: "local"
        URL:  "localhost"
    }
    staging: direct
    workDirectory: "/scratch/midway/"${env.USER}"/swiftwork"
    app.bash {
        executable: "/bin/bash"
        maxWallTime: "00:05:00"
    }
}

TCPPortRange: "50000,51000"
lazyErrors: false
executionRetries: 0
keepSiteDir: true
providerStagingPinSwiftFiles: false
alwaysTransferWrapperLog: true
Performance
The Swift staging method uses an intermediate staging location that is on a shared FS, each files is, in addition to being read from the initial location, written to and read from a shared FS, both of each are overhead. The only advantage to this is that you don’t need coasters to use it and it’s supported in a lot of cases.
3.9.5. Staging method : Wrapper
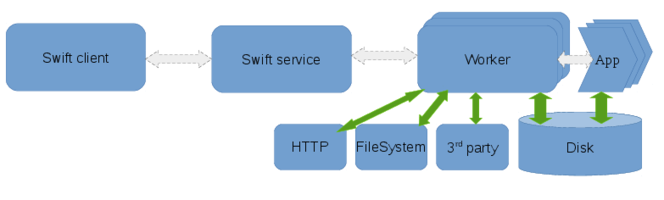
Summary
The wrapper staging method relies on a wrapper script used to stage files to and from the swift workers. Currently the wrapper staging method supports fetching files over HTTP and between the client filesystem. The wrapper staging method provides a flexible interface to add support for third party transfer mechanisms to the swift worker.
TODO: Is guc supported ?
When to use this mode
The repository for the input or output data can be accessed over a supported tranfer mechanism.
The data can be accessed only by an exotic tranfer mechanism, which could be incorporated into the supported methods for wrapper staging.
Example configs
sites: midway

site.midway {
        execution {
                type: "coaster"
                jobManager: "local:local"
                URL: "localhost"
        }
        filesystem {
                type: local
        }
        staging: "wrapper"
        scratch: "/tmp/"${env.USER}"/swift-scratch"
        workDirectory: "swiftwork"

        app.ALL {
                executable: "*"
        }
}

wrapperStagingLocalServer: "file://"
3.10. Site Selection
TODO
3.10.1. Summary
4. Configuration
Swift is mainly configured using a configuration file, typically called swift.conf. This file contains configuration properties and site descriptions. A simple configuration file may look like this:
site.mysite {
    execution {
        type: "coaster"
        URL: "my.site.org"
        jobManager: "ssh:local"
    }
    staging: "local"

    app.ALL {executable: "*"}
}

# select sites to run on
sites: [mysite]

# other settings
lazy.errors: false|
|
Swift versions 0.95 and older used a different configuration system in
which the same information was contained in three files: sites.xml,
swift.properties and tc.data. The old configuration files can be converted
to the new configuration format using the swift-convert-config utility that
comes with versions of Swift newer than 0.96: |
swift-convert-config -sites.file sites.xml -config swift.properties
    -tc.file tc.data -out swift.conf
4.1. Configuration Syntax
The Swift configuration files are expressed in a modified version of JSON. The main additions to JSON are:
-
Quotes around string values, in particular keys, are optional, unless the strings contain special characters (single/double quotes, square and curly braces, white space,
$,:,=,,,`,^,?,!,@,*,\), or if they represent other values:true,false,null, and numbers. -
=and:can be used interchangeably to separate keys from values -
=(or:) is optional before an open bracket -
Commas are optional as separators if there is a new line
-
${…}expansion can be used to substitute environment variable values or Java system properties. If the value of an environment variable is needed, it must be prefixed withenv.. For example${env.PATH}. Except for include directives, the${…}must not be inside double quotes for the substitution to work. The same outcome can be achieved using implicit string concatenation:"/home/"${env.USER}"/bin"
Comments can be introduced by starting a line with a hash symbol (#) or using
a double slash (//):
# This is a comment
// This is also a comment

keepSiteDir: true # This is a comment following a valid property
4.2. Include Directives
Include directives can be used to include the contents of a Swift configuration
file from another Swift configuration file. This is done using the literal
include followed by a quoted string containing the path to the target file.
The path may contain references to environment variables or system properties
using the substitution syntax explained above. For example:
# an absolute path name
include "/home/joedoe/swift-config/site1.conf"

# include a file from the Swift distribution package
include "${swift.home}/etc/sites/beagle.conf"

# include a file using an environment variable
include "${env.SWIFT_CONFIG_DIR}/glow.conf"
4.3. Property Merging
If two properties with the same name are present in a configuration file, they are either merged or the latter one overrides the earlier one. This depends on the type of property. Simple values are always overridden, while objects are merged. For example:
key: 1
key: 2
# key is now 2

object {
    key1: 1
}

object {
    key2: 2
}

# object is now { key1: 1, key2: 2}
This can be used to define certain template files that contain most of the
definitions for sites, and then include them in other files and override or add
only certain aspects of those sites. For example, assume swift-local.conf
includes a definition for a site named local that can be used to run
applications on the Swift client side. Override only the work directory
could be achieved with the following swift.conf:
include "swift-local.conf"

site.local {
    # use existing definition for site.local, but override workDirectory
    workDirectory: "/tmp"
}
A full override of the definition of site.local can be done by first
setting it to null and then providing a new definition:
include "swift-local.conf"

# forget previous definition of site.local
site.local: null

# define a new site.local from scratch
site.local {
    ...
}
4.4. Configuration Search Path
By default, Swift attempts to load multiple configuration files, merging them sequentially as described in the Property Merging Section. The files are:
-
Distribution Configuration ([D]):
${swift.home}/etc/swift.conf -
Site Configuration ([S]):
${env.SWIFT_SITE_CONF}(ifSWIFT_SITE_CONFis defined) -
User Configuration ([U]):
${env.HOME}/.swift/swift.conf(if present) -
Run Configuration ([R]):
${env.PWD}/swift.conf(if present)
In addition, a number of configuration properties can be overridden
individually on the Swift command line. For a list of such configuration
properties, please use swift -help or refer to the
Running Swift Section.
The run configuration can be overridden on the Swift command line using the
-config <file> command line argument. If the -config argument is specified,
Swift will not attempt to load swift.conf from the current directory and will
use the value of <file> instead.
The entire configuration search path can be replaced with a custom search path
using the -configpath command line argument. The value passed to -configpath
must be a list of paths pointing to various configuration files, separated by
the standard operating system path separator (: on Linux and ; on
Windows). For example:
swift -configpath /etc/swift/swift.conf:~/swift-configs/s1.conf:swift.confIf in doubt about what configuration files are being loaded or to troubleshoot
configuration issues, Swift can be started with the -listconfig command line argument. -listconfig accepts tow possible values:
-
files: will print a list of configuration files loaded by Swift -
full: will print a list of configuration files loaded by Swift, as well as the final merged configuration.
4.5. Configuration File Structure
The contents of a Swift configuration file can be divided into a number of relevant sections:
-
site declarations
-
global application declarations
-
Swift configuration properties
4.5.1. Site Declarations
Swift site declarations are specified using the site.<name> property, where
text inside angle brackets is to be interpreted as a generic label for
user-specified content, whereas content between square brackets is optional:
site.<name> {
    execution {...}
    [staging: "swift" | "local" | "service-local" | "shared-fs" | "wrapper"]
    [filesystem {...}]
    workDirectory: <path>

    [<site options>]
    [<application declarations>]
}
A site name can be any string. If the string contains special characters, it must be quoted:
site."$pecial-$ite" {...}4.5.2. Site Selection
Once sites are declared, they must be explicitly enabled for Swift to use them.
This can be achieved with the sites option, which accepts either an array or a comma-separated list of site names:
sites: ["site1", "site2"]

# alternatively:

sites: "site1, site2"
The sites option can also be specified on the Swift command line:
swift -sites site1,site2 script.swift4.5.3. Execution Mechanisms
The execution property tells Swift how applications should be executed on a
site:
    execution {
        type: <string>
        [URL: <string>]
        [jobManager: <string>]

        [<execution provider options>]
    }
The type property is used to select one of the mechanisms for application execution
that is known by Swift. A comprehensinve list of execution mechanisms can be found
in Execution Mechanisms Section. A summary is
shown below:
| Type | URL required | Uses jobManager | Default jobManager | Staging methods supported | Description |
|---|---|---|---|---|---|
no |
no |
- |
swift, local, wrapper |
Runs applications locally using a simple fork()-based mechanism |
|
|
yes |
yes |
none |
swift, wrapper, local, service-local, shared-fs, direct |
Submits applications through an automatically-deployed Swift Coasters service |
|
yes |
yes |
none |
swift, wrapper, local, service-local, shared-fs, direct |
Uses a manually deployed Swift Coasters service |
|
yes |
yes |
"fork" |
swift, wrapper |
Uses the GRAM: User’s Guide component of the Globus Toolkit. |
|
An alias for GRAM5 |
||||
|
yes |
no |
- |
swift, wrapper |
Runs applications using a Java implementation of the SSH protocol |
|
yes |
no |
- |
swift, wrapper |
Like SSH except it uses the command-line ssh tool. |
|
no |
no |
- |
swift, wrapper |
Submits applications to a PBS or Torque resource manager |
|
no |
no |
- |
swift, wrapper |
Submits applications using Condor |
|
no |
no |
- |
swift, wrapper |
Uses the Sun Grid Engine |
|
no |
no |
- |
swift, wrapper |
Uses the SLURM local scheduler |
|
no |
no |
- |
swift, wrapper |
Submits applications to Platform’s Load Sharing Facility |
The execution provider options are options that specify finer details on how
on application should be executed. They depend on the chosen mechanism and are detailed in
Execution Mechanisms Section. This is where
Coasters options, such as nodeGranularity or softImage, would
be specified. Example:
execution {
    type: "coaster"
    jobManager: "local:local"
    options {
        maxJobs: 1
        tasksPerNode: 2
        workerLoggingLevel: TRACE
    }
}
A complete list of Swift Coasters options can be found in Coaster Options
4.5.4. Staging
The staging property instructs Swift how to handle application input and output
files. The swift and wrapper staging methods are supported universally, but
the swift method requires a filesystem property to be specified. The
staging property defaults to swift. Support for the other choices is
dependent on the execution mechanism. The supported staging methods for each
execution mechanism are listed in the
Execution Mechanisms Section
above. For more details about each staging method, please refer to the
Application Function Execution
Section. A brief description of each staging method is provided below:
-
swift -
This method instructs Swift to use a filesystem provider to direct all necessary staging operations from the Swift client-side to the cluster head node. If this method is used, the
workDirectorymust point to a head node path that is on a shared file system accessible by the compute nodes. -
wrapper -
File staging is done by the Swift application wrapper
-
local -
Used to indicate that files should be staged in/out from/to the site on which Swift is running. In the case of Swift Coasters, the system proxies the tranfers between client side and compute nodes through the Coaster Service.
-
service-local -
This method instructs the execution mechanism provider to stage input and output files from the remote site where the execution service is located. For example, if a Coaster Service is started on the login node of a cluster, the Coaster Service will perform the staging from a file system on the login node to the compute node and back.
-
shared-fs -
This method is used by Coasters to implement a simple staging mechanism in which files are accessed using a shared filesystem that is accessible by compute nodes
-
direct -
Tries to avoid moving files around as much as possible and passes absolute path names to the application instead. The node on which the application is running must have access to the filesystem on which swift data is located.
4.5.5. File System
The file system property is used with staging: "swift" to tell Swift how to access remote file systems. It has the following form:
filesystem {
    type: <string>
    [URL: <string>]
}
Valid types are described below:
| Type | URL required | Description |
|---|---|---|
|
no |
Copies files locally on the Swift client side |
|
yes |
Accesses a remote file system using GridFTP |
|
yes |
An alias for |
|
yes |
Uses the SCP protocol |
4.5.6. Site Options
Site options control various aspects of how Swift handles application execution
on a site. All options except workDirectory are optional. The options are as
follows. Valid values are listed first, and, if applicable, are followed by
default values.
OS:  ("INTEL32::LINUX" | "INTEL64::LINUX" | "INTEL32::WINDOWS" |
"INTEL64::WINDOWS" | <string>)
Default value: "INTEL32::LINUX"
Can be used to tell Swift the type of the operating system
running on the remote site. By default, Swift assumes a UNIX/Linux type OS.
There is some limited support for running under Windows, in which case this
property must be set to one of "INTEL32::WINDOWS" or "INTEL64::WINDOWS"
workDirectory: <string>The <string> is a path representing a directory in which Swift should store a
set of files relevant to the execution of an application on the site. By
default, applications will be executed on the compute nodes in a sub-directory
of <string>. Swift must be able to create the workDirectory if it does not
exist, or it must be able to create files and-subdirectories in it if it exists.
scratch: <string>If specified, it instructs swift to run applications in a directory different
than workDirectory. The value of scratch must point to a file system
accessible on compute nodes (but not necessarily a shared file system). This
option is useful if applications do intensive I/O on temporary files created
in their work directory, or if they access their input/output files in a
non-linear fashion.
keepSiteDir: <boolean>Default value: false
If set to true, site application directories (i.e. workDirectory) will not
be cleaned up when Swift completes a run. This can be useful for debugging.
statusMode: ("files" | "provider")Default value: "files"
Controls whether application exit codes are handled by the execution mechanism or passed back to Swift by the Swift wrapper script through files. Traditionally, Globus GRAM did not use to return application exit codes. This has changed in Globus Toolkit 5.x. However, some local scheduler execution mechanisms, such as PBS, are still unable to return application exit codes. In such cases, it is necessary to pass the application exit codes back to Swift in files. This comes at a slight price in performance, since a file needs to be created, written to, and transferred back to Swift for each application invocation. It is however also the default, since it works in all cases.
maxParallelTasks: <integer>Default value: 2
The maximum number of concurrent application invocations allowed on this site.
initialParallelTasks: <integer>Default value: 2
The limit on the number of concurrent application invocations on this site when
a Swift run is started. As invocations complete successfully, the number of
concurrent invocations on the site is increased up to maxParallelTasks.
Additional, less frequently used options, are as follows:
wrapperParameterMode: ("args" | "files")Default value: "args"
If set to "files", Swift will, as much as possible, pass application
arguments through files. The applications will be invoked normally, with their
arguments in the **argv parameter to the main() function. This can be
useful if the execution mechanism has limitations on the size of command
line arguments that can be passed through. An example of execution mechanism
exhibiting this problem is Condor.
wrapperInterpreter: <string>Default value: "/bin/bash" (UNIX), "cscript.exe" (Windows)
Points to the interpreter used to run the Swift application invocation wrapper
wrapperScript: <string>Default value: "_swiftwrap" (UNIX), "_swiftwrap.vbs" (Windows)
Points to the Swift application invocation wrapper. The file must exist in the libexec directory in the Swift distribution.
wrapperInterpreterOptions: '[' [<string> [, <string>]*] ']'Default value: [] (UNIX), ["//Nologo"] (Windows)
Command line options to be passed to the wrapper interpreter
cleanupCommand: <string>Default value: "/bin/rm" (UNIX), "cmd.exe" (Windows)
A command to use for the cleaning of site directories (unless keepSiteDir is
set to true) at the end of a run.
cleanupCommandOptions: '[' [<string> [, <string>]*] ']'Default value: ["-rf"] (UNIX), ["/C", "del", "/Q"] (Windows)
Arguments to pass to the cleanup command when cleaning up site work directories
delayBase: <float>Default value: 2.0
Swift keeps a quality indicator for each site it runs applications on. This is
a number that gets increased for every successful application invocation, and
decreased for every failure. It then uses this number in deciding which sites
to run applications on (when multiple sites are defined). If this number
becomes very low (a sign of repeated failures on a site), Swift implements an
exponential back-off that prevents jobs from being sent to a site that
continuously fails them. delayBase is the base for that exponential back-off:
`"delay" = "delayBase"^(-"score" * 100)`
maxSubmitRate: <positiveInteger>Some combinations of site and execution mechanisms may become error prone if
jobs are submitted too fast. This option can be used to limit the submission
rate. If set to some number N, Swift will submit applications at a rate of at
most N per second.
4.5.7. Application Declarations
Applications can either be declared globally, outside of a site declaration, or specific to a site, inside a site declaration:
app.(<appName>|ALL) {
    # global application
    ...
}

site.<siteName> {
    app.(<appName>|ALL) {
        # site application
        ...
    }
}
A special application name, ALL, can be used to declare options for all
applications. When Swift attempts to run an application named X, it will
first look at site application declarations for app.X. If not found, it will
check if a site application declaration exists for app.ALL. The search will
continue with the global app.X and then the global all.ALL until a match
is found. It is possible that a specific application will only be declared
on a sub-set of all the sites and not globally. Swift will then only select
a site where the application is declared and will not attempt to run the
application on other sites.
An application declaration takes the following form:
app.<appName> {
    executable: (<string>|"*")
    [jobQueue: <string>]
    [jobProject: <string>]
    [maxWallTime: <time>]
    [options: {...}]
    <environment variables>
}
The executable is mandatory, and it points to the actual location of the
executable that implements the application. The special string "*" can
be used to indicate that the executable has the same name as the application
name. This is useful in conjunction with app.ALL to essentially declare
that a site can be used to execute any application from a Swift script. If the
executable is not an absolute path, it will be searched using the PATH
envirnoment variable on the remote site.
The following example illustrates how options are inherited:
    # global app options
    app.ALL {
        options {
            # use "ProjectX" on all sites
            project: "ProjectX"
        }
    }

    app.myapp1 {
        options {
            # this applies to all instances of myapp1
            # unless overriden on specific sites
            count: 2
        }
    }

    site.s1 {
        ...
        app.ALL {
            # use a default ppn of 4 for apps on this site
            ppn: 4
        }

        app.myapp1 {
            # use a ppn of 2 for this specific app on this site
            ppn: 2
        }
        ...
    }
}
Environment variables can be defined as follows:
env.<name>: <value>For example:
env.LD_LIBRARY_PATH: "/home/joedoe/lib"The remaining options are:
jobQueue: <string>If the application is executed using a mechanism that submits to a queuing system, this option can be used to select a specific queue for the application
jobProject: <string>A queuing system project to associate the job with.
maxWallTime: ("<mm>" | "<hh:mm>" | "<hh:mm:ss>")The maximum amount of time that the application will take to execute on the site. Most application execution mechanisms will both require and enforce this value by terminating the application if it exceeds the specified time. The default value is 10 minutes.
4.5.8. General Swift Options
There are a number of configuration options that modify the way that the Swift run-time behaves. They are listed below:
sites: ('[' <site> [, <site>]* ']' | "<site>[, <site]*")Selects, out of the set of all declared sites, a sub-set of sites to run applications on.
hostName: <string>Can be used to specify a publicly reacheable DNS name or IP address for this machine which is generally used for Globus or Coaster callbacks. Normally this should be auto-detected. However, if the machine does not have a public DNS name, this may need to be set manually.
TCPPortRange: "<lowPort>, <highPort>"A TCP port range can be specified to restrict the ports on which certain callback services are started. This is likely needed if your submit host is behind a firewall, in which case the firewall should be configured to allow incoming connections on ports in this range.
lazyErrors: <boolean>Default value: false
Use a lazy mode to deal with errors. When set to true Swift will proceed with
the execution until no more data can be derived because of errors in dependent
steps. If set to false, an error will cause the execution to immediately stop
executionRetries: <positiveInteger>Default value: 0
The number of time an application invocation will be retries if it fails until Swift finally gives up and declares it failed. The total number of attempts will be `1 + "executionRetries"`.
logProvenance: <boolean>Default value: false
If set to true, Swift will record provenance information in the log file.
alwaysTransferWrapperLog: <boolean>Default value: alwaysTransferWrapperLog: false
Controls when wrapper logs are transfered back to the submit host. If set to
false, Swift will only transfer a wrapper log for a given job when that job
fails. If set to true, Swift will transfer wrapper logs whether a job fails
or not.
fileGCEnabled: <boolean>Default value: true
Controls the file garbage collector. If set to false, files mapped by
collectable mappers (such as the concurrent mapper) will not be deleted when
their Swift variables go out of scope.
mappingCheckerEnabled: <boolean>Default value: true
Controls the run-time duplicate mapping checker (which indetifies mapping
conflicts). When enabled, a record of all mapped data is kept, so this comes at
the expense of a slight memory usage increase over time. If set false, the
mapping checker is disabled.
tracingEnabled: <boolean>Default value: false
Enables execution tracing. If set to true, operations within Swift such as
iterations, invocations, assignments, and declarations, as well as data
dependencies will be logged. This comes at a cost in performance. It is
therefore disabled by default.
maxForeachThreads: <positiveInteger>Default value: 16384
Limits the number of concurrent iterations that each foreach statement can have at one time. This conserves memory for swift programs that have large numbers of iterations (which would otherwise all be executed in parallel).
4.5.9. Ticker Options
tickerEnabled: <boolean>Default value: true
Controls the output ticker, which regularly prints information about the counts of application states on the Swift’s process standard output
tickerPrefix: <string>Default value: "Progress: "
Specifies a string to prefix to each ticker line output
tickerDateFormat: <string>Default value: "E, dd MMM yyyy HH:mm:ssZ"
Specifies the date/time format to use for the time stamp of each ticker line. It must conform to Java’s SimpleDateFormat syntax.
4.5.10. CDM Options
CDMBroadcastMode: <string>Default value: "file"
CDMFile: <string>Default value: "fs.data"
4.5.11. Replication Options
replicationEnabled: <boolean>Default value: false
If enabled, jobs that are queued longer than a certain amount of time will have a duplicate version re-submitted. This process will continue until a maximum pre-set number of such replicas is queued. When one of the replicas becomes active, all other replicas are canceled. This mechanism can potentially prevent a single overloaded site from completely blocking a run.
replicationMinQueueTime: <seconds>Default value: 60
When replication is enabled, this is the amount of time that a job needs to be queued until a new replica is created.
replicationLimit: <strictlyPositiveInteger>Default value: 3
The maximum number of replicas allowed for a given application instance.
4.5.12. Wrapper Staging Options
wrapperStagingLocalServer: <string>Default value: "file://"
When file staging is set to "wrapper", this indicates the default URL
scheme that is prefixed to local files.
4.5.13. Throttling Options
jobSubmitThrottle: (<strictlyPositiveInteger> | "off")Default value: 4
Limits the number of jobs that can concurrently be in the process of being submitted, that is in the "Submitting" state. This is the state where the job information is being communicated to a remote service. Certain execution mechanisms may become inefficient if too many jobs are being submitted concurrently and there are no benefits to parallelizing submission beyond a certain point. Please not that this does not apply to the number of jobs that can be active concurrently.
hostJobSubmitThrottle: (<strictlyPositiveInteger> | "off")Default value: 2
Like jobSubmitThrottle, except it applies to each individual site.
fileTransfersThrottle: (<strictlyPositiveInteger> | "off")Default value: 4
Limits the number of concurrent file transfers when file staging is set to
"swift". Arbitrarily increasing file transfer parallelism leads to little
benefits as the throughput approaches the maximum avaiable network bandwidth.
Instead it can lead to an increase in latencies which may increase the chances
of triggering timeouts.
fileOperationsThrottle: (<strictlyPositiveInteger> | "off")Default value: 8
Limits the number of concurrent file operations that can be active at a given
time when file staging is set to "swift". File operations are defined to be all
remote operations on a filesystem that exclude file transfers. Examples are:
listing the contents of a directory, creating a directory, removing a file, etc.
4.5.14. Global Versions of Site Options
staging: ("swift" | "local" | "service-local" | "shared-fs" | "wrapper")Default value: "swift"
See staging.
4.6. Execution Mechanisms
Swift allows application execution through a number of mechanisms (or execution providers). The choice of each mechanism is dependent on the software installed on a certain compute cluster. The following sub-sections list the available choices together with their supported options as well as the available app options when using the respective execution type.
The local execution mechanism can be used to run applications locally through
simple fork() calls.
- General Configuration
-
URL required
no
Job Manager
not used
Staging methods
swift,wrapper,local,service-local,shared-fs,direct - Options
-
N/A
- Application Options
-
Name Type Default Value Description countInteger
1
Launch this many copies of the application for each invocation
- Example
    site.local {
        execution {
            type: "local"
        }

        staging: direct

        app.ALL {
            executable: "*"
            count: 1
        }
}Uses the GRAM component of the Globus Toolkit to launch jobs on remote resources.
- General Configuration
-
URL required
yes
Job Manager
In GRAM, job managers instruct the GRAM service to submit jobs to specific resource managers on the server side. The exact available job managers depend on the particular GRAM installation. However,
"fork", which instructs GRAM to run jobs directly on the service node, should always be available. In addition, the available job managers would typically match the queuing systems installed on the server side. For example, if a cluster uses Torque/PBS, then the"PBS"job manager should be available. The following is a list of known possible job manager values:"fork","PBS","LSF","Condor","SGE","Slurm"Staging methods
swift,wrapper - Options
-
N/A
- Application Options
-
For a complete list and description of these options, please see the Globus GRAM documentation
Name Type Default Value Description countInteger
1
Launch this many copies of the application for each invocation
max_timeInteger (minutes)
-
max_wall_timeInteger (minutes)
-
max_cpu_timeInteger (minutes)
-
max_memoryInteger (MB)
-
min_memoryInteger (MB)
-
projectString
-
A LRM project to associate the job with
queueString
-
LRM queue to submit to
- Example
    site.example {
        execution {
            type: "gt5"
            url: "login.example.org"
            jobManager: "PBS"
        }

        staging: swift

        app.sim {
            executable: /usr/bin/sim
            queue: "fast"
            min_memory: 120
        }
}Runs jobs through a Java implementation of the SSH protocol. This mechanism generally results in a higher throughput than using the command-line SSH tool since it can reduce the number of authentication operations by re-using connections.
- General Configuration
-
URL required
yes
Job Manager
not used
Staging methods
swift, wrapper
- Options
-
N/A
- Application Options
-
N/A
- Example
    site.example {
        execution {
            type: "ssh"
            url: "login.example.org"
        }
}Uses the ssh command-line tool to run jobs.
- General Configuration
-
URL required
yes
Job Manager
not used
Staging methods
swift, wrapper
- Options
-
N/A
- Application Options
-
N/A
- Example
    site.example {
        execution {
            type: "ssh-cl"
            url: "login.example.org"
        }
}Submits jobs directly to a Torque/PBS queue.
- General Configuration
-
URL required
no
Job Manager
not used
Staging methods
swift, wrapper
- Options
-
N/A
- Application Options
-
Name Type Default Value Description countInteger
1
Request this number of nodes for the job
ppnInteger
1
Sets the number of Processes Per Node
depthInteger
1
Only used if
mppis set totrue. Sets the depth (number of OpenMP threads/cores to allocate for each process)pbs.mppBoolean
false
If set to
true, use the mpp versions ofcount,ppn, anddepth:mppwidth,mppnppn,mppdepthrespectively.pbs.propertiesString
-
If specified, this string will be passed verbatim to PBS inside the
"#PBS -l"line.projectString
-
A PBS project to associate the job with
queueString
-
PBS queue to submit to
pbs.resource_listString
-
WRITEME!
pbs.aprunBoolean
false
If specified, use the
apruntool instead of ssh to start jobs on the compute nodes.aprunis a tool typically found on Cray systems. - Example
    site.pbs {
        execution {
            type: "PBS"
        }

        app.sim {
                executable: "/usr/bin/sim"
                count: 2
                ppn: 2
                depth: 2
                pbs.mpp: true
                queue: "fast"
        }
}Submits jobs using the HTCondor system.
- General Configuration
-
URL required
no
Job Manager
not used
Staging methods
swift, wrapper
- Options
-
N/A
- Application Options
-
Name Type Default Value Description jobType"MPI","grid","nonshared", nonenone
Specifies the job type (Condor universe).
"nonshared"translates to the"vanilla"universe.holdIsFailureBoolean
false
Treat jobs in the held state as failed.
countInteger
1
Number of machines to request for the job
condor.*Any
-
Can be used to pass arbitrary properties to Condor.
- Example
    site.condor {
        execution {
            type: "Condor"
        }

        app.sim {
            executable: "/usr/bin/sim"
            condor.leave_in_queue: "TRUE"
        }
    }
Coasters are a mechanism that packages multiple swift application invocations into larger LRM jobs resulting in increased efficiency when running multiple small applications. To distinguish between the application invocations and the jobs in which Coasters package them, the terms task and job are used, respectively.
- General Configuration
-
URL required
maybe
Job Manager
"em1:em2", whereem1is an execution mechanism used to start the Coaster Service andem2is an execution mechanism used by the Coaster Service to start jobs. Ifem1requires an URL, then the URL is required. Options specific toem2can be specified usingoptions.jobOptions.Staging methods
swift, wrapper, local, service-local, shared-fs, direct
- Options
-
Name Type Default Value Description maxJobsInteger
20
The maximum number of jobs that can be running at a time.
nodeGranularityInteger
1
If specified, the number of nodes requested for each job will be a multiple of this number
tasksPerNodeInteger
1
The maximum number of concurrent tasks allowed to run on a node
allocationStepSize`[0, 1`]
0.1
The Coaster service allocates jobs periodically depending on the number of tasks queued. This number can be used to limit the fraction of jobs out of
maxJobsthat will be used in each allocation step.lowOverallocation`[1, infty)`
10
Indicates how much bigger the job wall time should be in comparison to the task wall time for tasks that have a small wall time (around 1 second)
highOverallocation`[1, infty)`
1
Indicates how much bigger the job wall time should in comparison to the task wall time for tasks that have a very large wall time
overallocationDecayFactor`(0, infty)`
1e-3
Used to interpolate the "overallocation" for task wall times that are neither very large or very small. The formula used is `"jw" = "tw" * ((L - H) * e^(-"tw" * D) + H)`, where
jwis the job walltime,twis the task walltime,LislowOverallocation,HishighOverallocation, andDisoverallocationDecayFactor.spread`[0, 1`]
0.9
When allocating jobs, the total number of nodes to allocate can be fixed based on, for example, maximizing parallelism for all the tasks. However, the way the nodes are distributed to individual jobs can be arbitrary. This parameter controls whether nodes should be uniformly distributed among jobs (
spread = 0) or if the node distribution should be as diverse as possible (spread = 1). A high spread could be useful in fitting jobs better into a cluster’s schedule.reserveInteger (seconds)
60
The amount of time to add to each job’s wall time in order to prevent premature termination of tasks due to various overheads
maxNodesPerJobInteger
1
The maximum number of nodes that a job is allowed to have.
maxJobTime"HH:MM:SS"
-
The maximum wall time that a job is allowed to have
userHomeOverrideString
-
A path that can be used to override the default user home directory. This may be necessary on systems on which compute nodes do not have access to the default user home directory.
internalHostNameString
-
A host name or address that can be used to initiate connections from compute nodes to the login node. Specifying this is seldom necessary.
jobQueueString
-
The LRM queue to submit the jobs to
jobProjectString
-
A LRM project to associate the job with
jobOptions.*Object
-
Any number of LRM options used to start the Coaster jobs. These options correspond to the execution mechanism specified by
em2in the job manager setting and are described in the App Options sections of the corresponding section of Execution Mechanisms.workerLoggingLevel"ERROR","WARN","INFO","DEBUG","TRACE", or nonenone
If specified, the Coaster Workers produce a log file
workerLoggingDirectoryString
The directory where the worker logs will be created. This directory needs to be accessible from compute nodes and is set to "~/.globus/coasters" by default.
softImageString
-
WRITEME!
- Application Options
-
N/A
- Example
    site.condor {
        execution {
            type: "Condor"
        }

        app.sim {
            executable: "/usr/bin/sim"
            condor.leave_in_queue: "TRUE"
        }
    }
5. Running Swift
5.1. Invoking Swift
Swift can be invoked from the command line using the following syntax:
swift <options> [<file> [<arguments>]]In general, <file> is a Swift program and is required unless an immediate
option is specified, which causes Swift to perform a certain action without
running any programs.
The <arguments> can be specified and they will be passed to the Swift program
where they can be accessed using either the arg or
args functions.
The valid options are as follows:
-
-helpor-h -
Tells Swift to displays usage and option information and quit
-
-version -
Displays the Swift version and quits
-
-recompile -
Forces Swift to re-compile the invoked Swift script. While Swift is meant to detect when recompilation is necessary, in some special cases it fails to do so. This flag helps with those special cases.
-
-dryrun -
Runs the SwiftScript program without submitting any jobs (can be used to get a graph)
-
-resume <logfile> -
Resumes the execution using a log file
-
-config <file> -
Indicates the run configuration file to be used for this run. If no custom configuration search path is specified, this will replace the default run configuration file (
./swift.conf) if it exists, or append to the configuration search path otherwise. If a search path is specified, the value of this argument will be appended to the search path. -
-configpath <directories> -
Specifies a custom configuration search path. If supplied, the default configuration search path will be ignored and configurations will be loaded from files specified in the value of this argument. The files in the value must be separated using the operating system’s path separator.
-
-listconfig (files | full) -
Lists details about the loaded configuration. If files, lists only the configuration files used, while full lists both the files and all the property values.
-
-sitelist -
Prints a list of sites available in the swift configuration
-
-verboseor-v -
Increases the level of output that Swift produces on the console to include more detail about the execution
-
-debugor-d -
Increases the level of output that Swift produces on the console to include lots of detail about the execution
-
-logfile <file> -
Specifies a file where log messages should go to. By default Swift uses the name of the SwiftScript program being run and additional information to make the name unique.
-
-cdmfile <file> -
Specifies a CDM policy file.
-
-runid <string> -
Specifies the run identifier. This must be unique for every invocation of a script and is used in several places to keep files from different runs cleanly separated. By default, a datestamp and random number are used to generate a run identifier.
-
-ui <summary | text | TUI[:port] | http[:[password@]port] -
Indicates how swift should display run-time information. The following are valid values:
-
none -
does not print any progress information
-
summary -
(default) - causes swift to regularly print a count of jobs for each state that a job can be in
-
text -
regularly prints a more detailed table with Swift run-time information
-
TUI -
displays Swift run-time information using an interactive text user interface. The terminal from which Swift is run must support standard ANSI/VT100 escape sequences. If a port is specified, the interface will also be available via
telnetat the specified port. -
http -
enables an http server allowing access to swift run-time information using a web browser. If the port is zero or unspecified, Swift will print the URL of the UI service.
-
-
-reducedLogging -
Makes logging more terse by disabling provenance information and low-level task messages
-
-minimalLogging -
Makes logging much more terse: reports warnings only
-
-pauseOnStart -
Pauses execution on start. Useful for attaching a debugger or profiler to the Swift process
-
-e <string> -
Runs the swift script code contained in
<string>
In addition, a number of general Swift options can be specified as command line options. Properties specified on the command line always override all other properties. The properties that can be specified on the command line are: sites, hostName, TCPPortRange, lazyErrors, keepSiteDir, alwaysTransferWrapperLog, logProvenance+, fileGCEnabled, mappingCheckerEnabled, tracingEnabled, maxForeachThreads, CDMFile
5.2. Run directories
Every time a Swift program is run, a run directory gets created in the
directory from which Swift is invoked. The run directory has the name of
runNNN, where NNN is a sequence of three digits starting at 001 and is
incremented for each subsequent run.
The run directories are most useful for debugging. They contain the following files:
-
swift.log -
The main Swift log file
-
scriptname-runNNN.d -
A debug directory containing application invocation logs
-
scripts -
(optional) A directory that may contain scheduler scripts used by some of the execution mechanisms (e.g.
PBS,LSF,SLURM) to submit jobs to resource managers
5.3. Tools
5.3.1. Monitoring Tools
Monitoring tools can be started using the -ui command line argument when
invoking Swift. The two most notable versions are the TUI and the HTTP UI.
TUI
The TUI displays an interactive console interface which allows some basic monitoring.
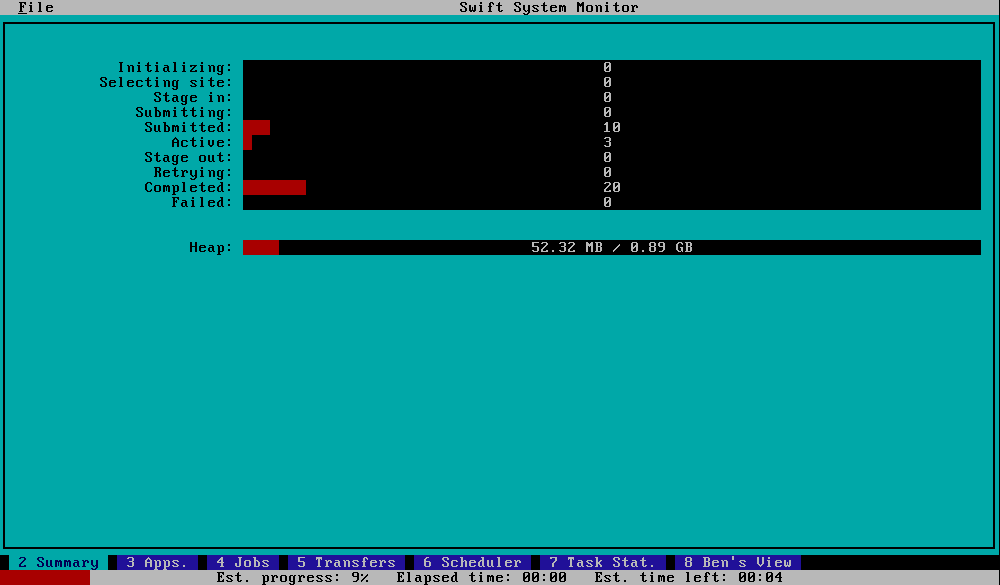
HTTP UI
The HTTP UI is a more featured monitoring tool for Swift. It supports plotting of various Swift metrics as well as live worker node data (if used with Coasters).
In order to use the HTTP UI, Swift should be invoked with the -ui http[:<port>] command line option. If a port is specified, Swift will bind the monitoring service to that port, otherwise a random TCP port will be used and Swift will print the monitor URL on the command line.
5.4. Troubleshooting
5.5. Performance Tips
- Shared Filesystems
-
-
Shared filesystems can be performance bottlenecks. One of the reasons this happens is because they need to ensure various forms of consistency when accessed from multiple locations concurrently. In addition, shared filesystems are in general used concurrently by multiple applications and users. With Swift, it is possible to avoid shared filesystems entirely, which can lead to dramatic performance improvements in some cases. This can be done by having both the Swift installation and the input files on a local disk, then selecting a work directory that lives in local disk (or ramdisk) on the compute node, and by using provider staging.
-
If the an application uses large files that would not fit on compute node local storage, one can use the above strategy to avoid shared filesystems in general, but then map the large files using "direct://" mode. This will ensure that most files avoid shared filesystems entirely, and use shared filesystems only when strictly necessary.
-
- The Swift Runtime
-
-
Avoid using the built-in monitoring tools. Instead, use the
swift-log-infotool with the-foption, which incrementally parses a Swift run log as it is generated and can provide the same information as the built-in monitoring tools. -
After ensuring that a Swift application runs correctly, when running in production mode, disable costly features used for troubleshooting, such as:
-
Run with the
minimalLoggingoption. Large Swift runs can generate a lot of logging information. Writing the log to disk, as well as constructing all the log messages can be expensive. -
Disable the mapping checker using
mappingCheckerEnabled: falseinswift.conf. The mapping checker uses memory and causes thread contention. -
Disable replication unless you know you need it.
-
Set
statusMode: providerinswift.conf. This avoids some I/O. -
Unless you are running on unreliable resources, set
executionRetriesto 0. This allows the Swift garbage collector to free memory associated with file names and application command line arguments as soon as a task is sent for execution. By contrast, ifexecutionRetriesis not zero, Swift needs to keep file and argument information in memory until it is known that the application has completed successfully (or the maximum number of retries is exceeded). -
If you are using Coasters, and the Coaster Service is on the same machine as the Swift client, use
staging: service-localinstead ofstaging: local. There is no need to read files on the client and proxy them through the service and the service can directly read those files.
-
-