Introduction
This tutorial describes how to set the Amazon cloud resources to run applications via Swift along with Swift’s coaster-service. The current package contains utilities to configure, add, remove and monitor cloud resources to a Swift execution. add/remove/monitor resources on a current application ru.
EC2 CLI API
This tutorial is tested with EC2 commandline tools API version 1.6.12.2. It
is expected to work through minor version changes. Since many commands are
sensitive to the columnar outputs of the EC2 API commands, some of it might
break on distant versions. The instructions for download, install and
configuring the EC2 CLI API can be found
here.
For quick install, you can download a copy as follows:
wget http://www.mcs.anl.gov/~ketan/ec2-api-tools.zip
unzip ec2-api-tools.zip
Make sure the PATH is set to point to the bin directory of the unzipped API
package. For example, if the package is unzipped in $HOME:
export PATH=$HOME/ec2-api-tools-1.6.12.2/bin:$PATHSwift Installation
To install Swift, follow the instructions found here. We use the Swift version 0.94 from the SVN repository.
|
Note
|
Swift installation is required only on the submit host and not on the cloud instances. |
To checkout the Swift-cloud provision package from SVN repository use the following command:
svn co https://svn.ci.uchicago.edu/svn/vdl2/SwiftApps/cloud swift-cloud
cd swift-cloud
Configure
Environment variables
Make sure GLOBUS_TCP_PORT_RANGE and GLOBUS_HOSTNAME are defined. For example:
export GLOBUS_TCP_PORT_RANGE=50000,51000
export GLOBUS_HOSTNAME=churn.mcs.anl.gov
EC2 configuration
Make sure you have access to an EC2 image ami-id, have security-group and
keypair set up. If you already have keypair for EC2 installed, you can find
via the following command:
ec2-describe-keypairsThe security-group must be set such that the ports defined in
GLOBUS_TCP_PORT_RANGE are open for both incoming and outgoing traffic.
Existing security groups can be queried as:
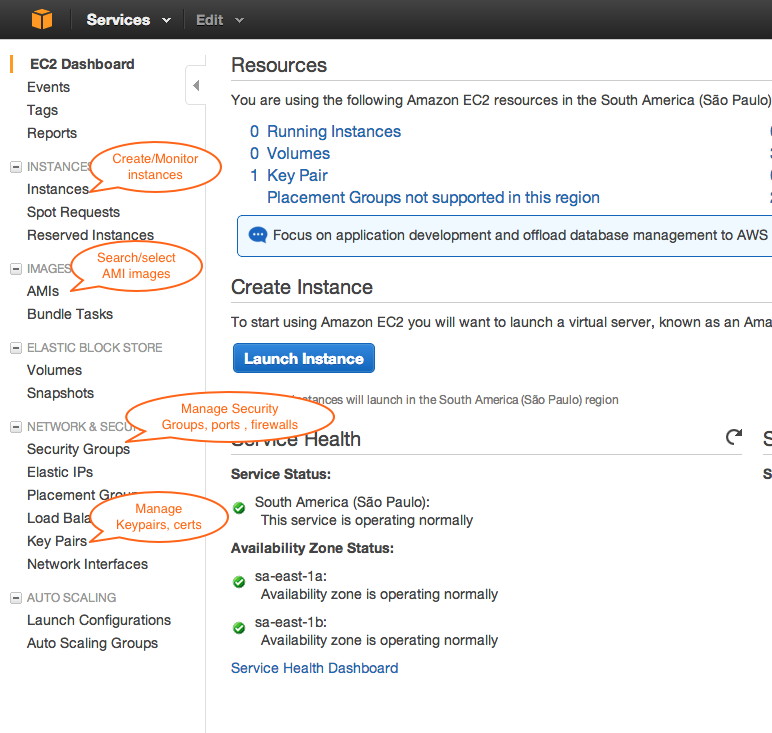
ec2-describe-security-groupsMore information on setting up a security group can be found here.
Following screenshot shows places where you can manage the various EC2 related settings from the default web-gui:
coaster-service.conf
Configure coaster-service.conf according to your environment. An example
coaster-service.conf can be found in the swift-cloud directory. Make sure
to set the EC2XXX variables to the correct values as per your EC2 allocation.
For example:
export EC2KEYPAIR=ketan
export EC2AMI=ami-cf0953a6
export EC2SECGRP=Swift
Set other environment variables to suitable values, for example:
export WORKER_LOCATION=/home/ubuntu/worker
#username on instances, can be root
export WORKER_USERNAME=ubuntu
export LOG_DIR=logs
export SHARED_FILESYSTEM=no
export SSH_TUNNELING=yes
Start coaster service
Start the coaster service using the following command:
start-coaster-serviceAbove command will generate an apps and sites.xml configuration file. Use
these configuration files to run Swift command as shown in the next section.
Make sure coaster-service.conf configuration is available in the current
working directory or use the -conf option to use config file located
elsewhere.
Typical output of the above start-coaster-service will look as follows:
Start-coaster-service...
Configuration: coaster-service.conf
Service address: localhost
Starting coaster-service
Service port: 50000
Local port: 50001
Generating sites.xml
Coaster workers can be started along with the same command if the IP addresses are added to the WORKER_HOSTS environment variable in the coaster-service.conf for example:
export WORKER_HOSTS="54.243.24.104 54.243.24.154"In this case, workers will start on the two instances and will be ready to run Swift scripts.
Start Swift run
Start swift run. Assuming your Swift script, applications and data are set, run using swift command as follows:
swift -sites.file sites.xml -tc.file apps -config cf catsnsleep.swift -s=10 -n=20As a result, if the command is successful, you will see the output similar to following:
Swift 0.94 swift-r7645 (swift modified locally) cog-r3877

RunID: 20140309-1354-sg9rjdja
Progress:  time: Sun, 09 Mar 2014 13:54:27 -0500
Progress:  time: Sun, 09 Mar 2014 13:54:28 -0500  Stage in:1  Submitted:14  Active:5
Progress:  time: Sun, 09 Mar 2014 13:54:38 -0500  Submitted:14  Active:5  Stage out:1
Progress:  time: Sun, 09 Mar 2014 13:54:48 -0500  Submitted:8  Active:5  Stage out:1  Finished successfully:6
Progress:  time: Sun, 09 Mar 2014 13:54:49 -0500  Submitted:2  Active:6  Finished successfully:12
Progress:  time: Sun, 09 Mar 2014 13:54:57 -0500  Submitted:2  Active:6  Finished successfully:12
Progress:  time: Sun, 09 Mar 2014 13:54:59 -0500  Submitted:2  Active:5  Stage out:1  Finished successfully:12
Progress:  time: Sun, 09 Mar 2014 13:55:10 -0500  Active:1  Stage out:1  Finished successfully:18
Final status: Sun, 09 Mar 2014 13:55:10 -0500  Finished successfully:20
The example catsnsleep.swift and cf properties files used in the above
command are provided with the package. Additionally, an executable catnap.sh
and a small data.txt files are provided with the package used by the
catsnsleep.swift script. As a result of the above command the script will run
20 app instances with a sleep time of 10 seconds in each call.
Manage resources
Add EC2 compute instances
Add more resources via addnodes. Use option -n to add by number and -a to
add by ip address. Use -t to specify the instance type (t1.micro, m1.small,
etc.). For example, the following
commandline will add 10 cloud instances of type t1.micro to the currently
executing run:
./addnodes -n 6 -t t1.micro|
Note
|
The above command will trigger a "create-instance" command on your EC2 account and can take upto a minute before the newly created instances can actually join the existing Swift execution. |
Typically, you will see output as follows:
Configuration: coaster-service.conf
6
Waiting for instances to start
Starting worker on 54.221.33.193
Starting worker on 54.221.101.177
Starting worker on 54.242.57.128
Starting worker on 54.204.204.129
Starting worker on 75.101.210.88
Starting worker on 54.226.151.155
The following command will add two nodes with ip 54.243.24.104 and 54.243.24.154:
./addnodes -a "54.243.24.104 54.243.24.154"Add EC2 spot instances
To add resources from the EC2 spot instances, use the -p option of the addnodes command. For example, the following commandline will add 2 EC2 spot instances with a bid of $ 0.08 :
./addnodes -p 0.08 -n 2|
Note
|
There is no guarantee of the resources being available at this price. In case the resources are not available, the request will be silently ignored. |
Remove EC2 compute instances
While the execution is on, you can remove EC2 resources via the remnodes commands with similar switches as the addnodes command. See the examples below:
./remnodes -n 5INSTANCE i-51c1c970 running shutting-down
INSTANCE i-51c1c470 running shutting-down
INSTANCE i-21v1c974 running shutting-down
INSTANCE i-51c1c973 running shutting-down
INSTANCE i-81c1c990 running shutting-downThe above command will remove 5 ec2 nodes from the current run. Currently running apps will fail and will be retried automatically by Swift on other available nodes.
./remnodes -a "54.243.24.104"The above command will remove the node with IP 54.243.24.104 from the current run.
|
Note
|
In place of IP, you can use public DNS name of the instance eg: |
./remnodes -a "ec2-50-99-41-60.compute-1.amazonaws.com ec2-50-99-41-56.compute-1.amazonaws.com"The above command will remove instances
ec2-50-99-41-60.compute-1.amazonaws.com and
ec2-50-99-41-56.compute-1.amazonaws.com from the current run.
|
Warning
|
The ./remnodes command will terminate the instances provided as arguments and
will terminate the top n instances provided as number n with its -n
switch. |
Monitor resources
Monitor Swift tasks and EC2 instances while jobs are running with the monitor command.
./monitorShut down
|
Warning
|
At this point make sure all your EC2 instances are terminated in order to avoid undue metering on those resources. |
Use the stop-coaster-service command to terminate the coaster service and remote worker agents:
stop-coaster-serviceTypical output of the above command will look as follows:
Stop-coaster-service...
Configuration: /homes/ketan/cloud/coaster-service.conf
Ending coaster processes..
Killing process 23005
Done
Troubleshoot
Coaster service
In case of errors on start-coaster-service, look for any messages related to the environment variables missing. Also make sure the GLOBUS_TCP_PORT_RANGE and GLOBUS_HOSTNAME environments are defined by echoing their values on command prompt as follows:
echo $GLOBUS_TCP_PORT_RANGE
echo $GLOBUS_HOSTNAME
Swift
-
Swift not found: Check your
PATHand make sure thebindirectory of Swift installation is added toPATH. -
Swift run shows no progress in task execution: Check if the EC2 instances are running via
ec2-describe-instances. -
Swift runs fail: Check if ports are open between submithost and cloud instance:
ec2-describe-group $(ec2-describe-instances | grep 'RESERVATION' | awk '{print $4}')The output will look similar to (some fields are removed for brevity):
+--------------+-----------+----------+------------+----------+--------+
|   ownerId    | groupName | groupDesc| ipProtocol | fromPort | toPort |
+--------------+-----------+----------+------------+----------+--------+
| 046798482406 | Swift     |for Swift |            |          |        |
|              |           |          | tcp        | 22       | 22     |
|              |           |          | tcp        | 50000    | 51000  |
+--------------+-----------+----------+------------+----------+--------+
Above output shows the group description for the security groups associated with your running instances. Feel free to contact Swift support if issues persist.
Upcoming Features
-
An Ability to test and automatically create appropriate security groups along with instance creation.
-
An Ability to test and create keypairs if not exist for accessing the EC2 resources.
-
An Ability to sense resource creation limits and steer requests to new regions if limits are reached.