This tutorial is viewable at:
Introduction: Why Parallel Scripting?
Swift is a simple scripting language for executing many instances of ordinary application programs on distributed and parallel resources. Swift scripts run many copies of ordinary programs concurrently, using statements like this:
foreach protein in proteinList {
  runBLAST(protein);
}
Swift acts like a structured "shell" language. It runs programs concurrently as soon as their inputs are available, reducing the need for complex parallel programming. Swift expresses workflow in a portable fashion: The same script can run on multicore computers, clusters, clouds, grids, and supercomputers.
In this tutorial, you will be able to first try a few Swift examples (examples 1-3) on your local machine, to get a sense of the language. Then, in examples 4-6 you will run similar workflows on any resource you may have access to, such as clouds (Amazon Web Services), Cray HPC systems, clusters etc, and see how more complex workflows can be expressed with Swift scripts.
Running the tutorial
To run the tutorial, ensure that (Oracle/Sun) java (1.7+) and swift-0.96 is installed on the machine you would be using to run the tutorial on.
Swift is available as loadable software module on Beagle, Midway and OSGConnect. If a module is not available the following steps describe the installation procedure.
Swift installation
# Download the swift-0.96 package
wget http://swiftlang.org/packages/swift-0.96.tar.gz

# Extract package
tar xfz swift-0.96.tar.gz

# Add swift to the PATH environment variable
export PATH=$PATH:/path/to/swift-0.96/bin

# To verify that Swift has successfully loaded, run:
$ swift -version
# This should print Swift 0.96
Setup the swift-tutorial
Clone the repository from github
git clone https://github.com/swift-lang/swift-tutorial.git
cd swift-tutorial
Or, download the zip file from github and unpack.
# Download
wget https://github.com/swift-lang/swift-tutorial/archive/master.zip
unzip master.zip
mv swift-tutorial-master swift-tutorial
cd swift-tutorial
Now, run the tutorial setup script:
source setup.sh # You must run this with "source" !Doing this will add the sample applications simulate and stats
(explained in the next part) and some other functionalities to
your local $PATH for you to run the tutorial.
Note: We will come back to Swift configuration using the swift.conf file
in part4-6 to enable remote sites for computation.
Tutorial Section One
This section will be a walk-through of the getting a simple "mock" science application running with swift on your local machine (localhost).
Example 1: Run a single application under Swift
The first swift script, p1.swift, runs simulate.sh to generate a single random number. It writes the number to a file.
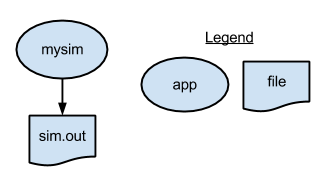
type file;

app (file o) simulation ()
{
  simulate stdout=filename(o);
}

file f <"sim.out">;
f = simulation();
To run this script, run the following command:
$ cd swift-tutorial/part01
$ swift p1.swift
Swift 0.96
RunID: run001
Progress: Thu, 22 Jan 2015 16:21:51-0600
Progress: Thu, 22 Jan 2015 16:21:52-0600  Active:1
Final status:Thu, 22 Jan 2015 16:22:11-0600  Finished successfully:1

$ cat sim.out
      18
To cleanup the directory and remove all outputs (including the log files and directories that Swift generates), run the cleanup script which is located in the tutorial PATH:
$ cleanup|
|
You will also find a Swift configuration file in each partNN directory
of this tutorial. This specify the environment-specific details of target
computational resource where the application programs would be executed. This
swift configuration file will be explained in more detail in parts 4-6, and can
be ignored for now. |
Example 2: Running an ensemble of many apps in parallel with a "foreach" loop
The p2.swift script introduces the foreach parallel iteration construct to run many concurrent simulations.
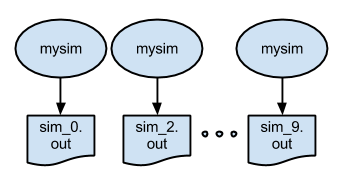
type file;

app (file o) simulation ()
{
  simulate stdout=filename(o);
}

foreach i in [0:9] {
  file f <single_file_mapper; file=strcat("output/sim_",i,".out")>;
  f = simulation();
}
The script also shows an example of naming the output files of an ensemble run. In this case,
the output files will be named
output/sim_N.out.
To run the script and view the output:
$ cd swift-tutorial/part02
$ swift p2.swift
Swift 0.96
RunID: run001
Progress: Thu, 22 Jan 2015 16:24:07-0600
Progress: Thu, 22 Jan 2015 16:24:08-0600 Active:10
Final status:Thu, 22 Jan 2015 16:24:27-0600 Finished successfully:10
$ ls output/
sim_0.out sim_1.out sim_2.out sim_3.out sim_4.out sim_5.out sim_6.out sim_7.out sim_8.out sim_9.out
$ cat output/sim_1.out
13
$ cat output/sim_2.out
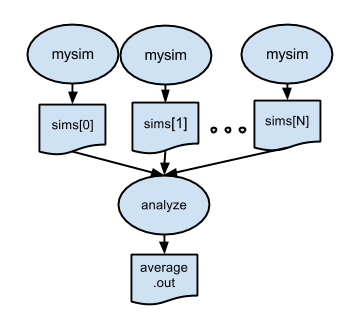
4Example 3: Analyzing results of a parallel ensemble
After all the parallel simulations in an ensemble run have completed,
it is typically necessary to gather and analyze their results with some
kind of post-processing analysis program or script. p3.swift
introduces such a postprocessing step. In this case, the files created
by all of the parallel runs of simulation.sh will be averaged by
the trivial "analysis application" stats.sh:

type file;

app (file o) simulation (int sim_steps, int sim_range, int sim_values)
{
  simulate "--timesteps" sim_steps "--range" sim_range "--nvalues" sim_values stdout=filename(o);
}

app (file o) analyze (file s[])
{
  stats filenames(s) stdout=filename(o);
}

int nsim   = toInt(arg("nsim","10"));
int steps  = toInt(arg("steps","1"));
int range  = toInt(arg("range","100"));
int values = toInt(arg("values","5"));

file sims[];

foreach i in [0:nsim-1] {
  file simout <single_file_mapper; file=strcat("output/sim_",i,".out")>;
  simout = simulation(steps,range,values);
  sims[i] = simout;
}

file stats<"output/average.out">;
stats = analyze(sims);
To run:
$ cd swift-tutorial/part03
$ swift p3.swift
Swift 0.96
RunID: run001
Progress: Thu, 22 Jan 2015 16:27:23-0600
Progress: Thu, 22 Jan 2015 16:27:24-0600  Active:10
Final status:Thu, 22 Jan 2015 16:27:44-0600  Finished successfully:11

$ ls output/
average.out  sim_0.out  sim_1.out  sim_2.out  sim_3.out  sim_4.out  sim_5.out  sim_6.out  sim_7.out  sim_8.out  sim_9.out

$ cat output/average.out
52
Note that in p3.swift we expose more of the capabilities of the
simulate.sh application to the simulation() app function:
app (file o) simulation (int sim_steps, int sim_range, int sim_values)
{
  simulate "--timesteps" sim_steps "--range" sim_range "--nvalues" sim_values stdout=filename(o);
}
p3.swift also shows how to fetch application-specific values from
the swift command line in a Swift script using arg() which
accepts a keyword-style argument and its default value:
int nsim   = toInt(arg("nsim","10"));
int steps  = toInt(arg("steps","1"));
int range  = toInt(arg("range","100"));
int values = toInt(arg("values","5"));
Now we can specify that more runs should be performed and that each should run for more
timesteps, and produce more that one value each, within a specified range, using command line
arguments placed after the Swift script name in the form -parameterName=value:
Now try running (-nsim=) 100 simulations of (-steps=) 1 second each:
$ swift p3.swift -nsim=100 -steps=1
Swift 0.96
RunID: run002
Progress: Thu, 22 Jan 2015 16:29:45-0600
Progress: Thu, 22 Jan 2015 16:29:46-0600  Selecting site:80  Active:20
Progress: Thu, 22 Jan 2015 16:30:07-0600  Selecting site:60  Active:20  Finished successfully:20
Progress: Thu, 22 Jan 2015 16:30:28-0600  Selecting site:40  Active:20  Finished successfully:40
Progress: Thu, 22 Jan 2015 16:30:49-0600  Selecting site:20  Active:20  Finished successfully:60
Progress: Thu, 22 Jan 2015 16:31:10-0600  Active:20  Finished successfully:80
Final status:Thu, 22 Jan 2015 16:31:31-0600  Finished successfully:101
We can see from Swift’s "progress" status that the tutorial’s default
swift.conf parameters for local execution allow Swift to run up to 20
application invocations concurrently on the login node. We will look at
this in more detail in the next sections where we execute applications
on the site’s compute nodes.
Tutorial Section Two
This section introduces the aspects of running on remote computational resources.
We will go into the configuration aspects that allow swift to run your applications
on computation resources. The swift.conf file contains definitions of various aspects
of different remote computational resources that swift can run your tasks on.
The examples 4-6, are designed to run on remote sites, and require configurations to be set in
the swift.conf. Here are some of the remote sites defined in the supplied config files,
swift.conf, xsede.conf and nersc.conf:
-
Beagle (UChicago)
-
Blues (LCRC at Argonne)
-
Midway (UChicago)
-
Edison (NERSC)
-
OSGConnect
-
Amazon EC2
-
Legion (Universty College London)
-
Swan (Cray Partner Network)
-
Stampede (XSEDE/TACC)
-
Gordon (XSEDE/SDSC)
-
Blacklight (XSEDE/PSC)
-
Collection of Ad-hoc nodes (ad-hoc-1..N).
Please note that the XSEDE sites Stampede, Gordon, Blacklight and Trestles are defined in the config file : xsede.conf.
In order to use a different config file besides the default config file swift.conf, specify the config file on the swift commandline using the -config option. For example:
For part04: swift -config xsede.conf -sites stampede p4.swift
To configure the remote site definition for a particular site, open the swift-tutorial/swift.conf file and edit the site entry for that site. For example, if you like to run the tutorial on the Midway cluster, edit the site.midway entry in the swift-tutorial/swift.conf file and follow the instructions given for midway in the config file.
Here is a snippet from the swift.conf for the midway cluster:
# Instructions for Midway:
# 1. If you are running on the midway login nodes you set jobManager: "local:slurm"
# 2. Set workDirectory to /tmp/your_username_on_midway
site.midway {
    execution {
        type      : "coaster"                         # Use coasters to run on remote sites
        URL       : "midway.rcc.uchicago.edu"         # Midway login node
        jobManager: "ssh-cl:slurm"                    # Use ssh-cl to connect, slurm is the Local resource manager
        options {
            maxJobs         : 1                       # Max jobs submitted to LRM
            nodeGranularity : 1                       # Nodes per job
            maxNodesPerJob  : 1                       # Nodes per job
            tasksPerNode    : 1                       # Tasks per Node
            jobQueue        : "sandyb"                # Select queue from (sandyb, westmere, ...)
            maxJobTime      : "00:25:00"              # Time requested per job
        }
    }
    staging             : "local"                     # Stage files from "local" system to Midway
    workDirectory       : "/tmp/"${env.MIDWAY_USERNAME} # Location for intermediate files
    maxParallelTasks    : 101                         # Maximum number of parallel tasks
    initialParallelTasks: 100                         # Maximum number of tasks at start
    app.ALL { executable: "*" }                       # All tasks to be found from commandline
}
Note: To ensure that the site you have selected is used by swift for the workflow, update the "sites: [<SITE_NAME>…]" with "sites: [midway]".
There are detailed instructions for each of the sites in the Remote site configuration section.
Example 4: Running a simple app on remote node
In p4.swift, there is a simple app which takes a file containing random numbers and sort them before returning a sorted output. In the part04
folder we have a file, unsorted.txt, which contains 100 random integers ranging from 0 to 99 and we wish to run the job on a remote computational resource.
Ensure that you have configured the swift.conf for your target remote site.
type file;

app (file out) sortdata (file unsorted)
{
    sort "-n" filename(unsorted) stdout=filename(out);
}

file unsorted <"unsorted.txt">;
file sorted   <"sorted.txt">;

sorted = sortdata(unsorted);
We rely on the common sort command line utility in this example. When a remote site is set as the execution target,
Swift will connect to it and start swift-workers which in turn will execute tasks, in this case sort. Swift handles the
staging or moving of the necessary input and output files between the target systems and the machine you are running Swift on.
Once Swift completes execution, you should see a new sorted.txt file in the folder containing numerically sorted
results.
For example, to run the job remotely on Midway and to view the output:
$ cd swift-tutorial/part04
$ swift p4.swift
Swift 0.96
RunID: run001
Progress: Thu, 22 Jan 2015 17:09:43-0600
Progress: Thu, 22 Jan 2015 17:09:44-0600  Submitting:1
Progress: Thu, 22 Jan 2015 17:09:59-0600  Submitted:1
Progress: Thu, 22 Jan 2015 17:10:06-0600  Stage in:1
Progress: Thu, 22 Jan 2015 17:10:07-0600  Stage out:1
Final status: Thu, 22 Jan 2015 17:10:14-0600  Finished successfully:1

$ more unsorted.txt
7
49
73
58
30
72
...

$ more sorted.txt
1
2
3
4
5
...|
|
Once the Swift status shows the jobs to be "Submitted", the time to completion of jobs can vary based on how busy the queues are on the target resource. |
|
|
The Remote configuration section explains how to check the status of your jobs in the queue for systems with PBS, Condor or Slurm schedulers. |
Example 5: Running a parallel ensemble on compute resources
p5.swift will run our mock "simulation" applications on compute nodes. The
script is similar to p3.swift, but specifies that each simulation app
invocation should additionally return the log file which the application writes
to stderr. In p3.swift the apps simulation and stats called the binaries
stats and simulate which are available on the local machine and is present in
the system path. The p5.swift script
app (file out, file log) simulation (int sim_steps, int sim_range, int sim_values, file sim_script)
{
  bash @sim_script "--timesteps" sim_steps "--range" sim_range "--nvalues" sim_values stdout=@out stderr=@log;
}
type file;

app (file out, file log) simulation (int sim_steps, int sim_range, int sim_values, file sim_script)
{
  bash @sim_script "--timesteps" sim_steps "--range" sim_range "--nvalues" sim_values stdout=@out stderr=@log;
}

app (file out, file log) analyze (file s[], file stat_script)
{
  bash @stat_script filenames(s) stdout=@out stderr=@log;
}

int nsim   = toInt(arg("nsim",   "10"));
int steps  = toInt(arg("steps",  "1"));
int range  = toInt(arg("range",  "100"));
int values = toInt(arg("values", "5"));

file sims[];
file simulate_script <"simulate.sh">;
file stats_script <"stats.sh">;

foreach i in [0:nsim-1] {
  file simout <single_file_mapper; file=strcat("output/sim_",i,".out")>;
  file simlog <single_file_mapper; file=strcat("output/sim_",i,".log")>;
  (simout,simlog) = simulation(steps,range,values,simulate_script);
  sims[i] = simout;
}

file stats_out<"output/average.out">;
file stats_log<"output/average.log">;
(stats_out, stats_log) = analyze(sims,stats_script);
To run:
$ cd swift-tutorial/part05
$ swift p5.swift
Swift 0.96
RunID: run001
Progress: Thu, 22 Jan 2015 17:15:01-0600
Progress: Thu, 22 Jan 2015 17:15:02-0600  Submitting:10
Progress: Thu, 22 Jan 2015 17:15:16-0600  Submitted:10
Progress: Thu, 22 Jan 2015 17:15:24-0600  Submitted:6  Active:4
Progress: Thu, 22 Jan 2015 17:15:45-0600  Stage in:1  Submitted:3  Active:2  Finished successfully:4
Progress: Thu, 22 Jan 2015 17:15:46-0600  Stage in:1  Submitted:2  Active:3  Finished successfully:4
Progress: Thu, 22 Jan 2015 17:15:47-0600  Submitted:2  Active:4  Finished successfully:4
Progress: Thu, 22 Jan 2015 17:16:07-0600  Active:3  Finished successfully:7
Progress: Thu, 22 Jan 2015 17:16:08-0600  Active:2  Stage out:1  Finished successfully:7
Progress: Thu, 22 Jan 2015 17:16:21-0600  Active:2  Finished successfully:8
Progress: Thu, 22 Jan 2015 17:16:28-0600  Stage in:1  Finished successfully:10
Progress: Thu, 22 Jan 2015 17:16:29-0600  Stage out:1  Finished successfully:10
Final status: Thu, 22 Jan 2015 17:16:51-0600  Finished successfully:11

# Open the output/average.log to take a look at the rich set of machine specific
# information collected from the target system.
$ more output/average.log
Start time: Thu Jan 22 17:16:29 CST 2015
Running as user: uid=6040(yadunandb) gid=1000(ci-users) groups=1000(ci-users),1033(vdl2-svn),1082(CI-CCR000013),1094(CI-SES000031),1120(CI-IBN000050)
Running on node: nid00116
...
Performing larger Swift runs
To test with larger runs, there are two changes that are required. The first is a change to the command line arguments. The example below will run 1000 simulations with each simulation taking 5 seconds.
# You can increase maxJobs or tasksPerNode to increase the resources available to Swift
# With the default swift.conf, the following will be processed 4 tasks at a time :
$ swift p5.swift -steps=5 -nsim=100
Swift 0.96
RunID: run001
Progress: Thu, 22 Jan 2015 17:35:01-0600
Progress: Thu, 22 Jan 2015 17:35:02-0600 Submitting:100
Progress: Thu, 22 Jan 2015 17:35:16-0600 Submitted:100
Progress: Thu, 22 Jan 2015 17:35:27-0600 Submitted:96 Active:4
Progress: Thu, 22 Jan 2015 17:35:52-0600 Submitted:92 Active:4 Finished successfully:4
Progress: Thu, 22 Jan 2015 17:36:17-0600 Submitted:92 Active:3 Stage out:1 Finished successfully:4
Progress: Thu, 22 Jan 2015 17:36:18-0600 Submitted:88 Active:4 Finished successfully:8
...
Progress: Thu, 22 Jan 2015 17:46:27-0600 Stage out:1 Finished successfully:99
Progress: Thu, 22 Jan 2015 17:46:40-0600 Stage in:1 Finished successfully:100
Progress: Thu, 22 Jan 2015 17:46:53-0600 Active:1 Finished successfully:100
Final status: Thu, 22 Jan 2015 17:46:53-0600 Finished successfully:101
# From the time-stamps it can be seen that run001 took ~12minutes, with only 4 jobs active at
# any given time
# The following run was done with swift.conf modified to use higher tasksPerNode and maxJobs
# maxJobs : 2 # Increased from 1
# tasksPerNode : 15 # Increased from 4
$ swift p5.swift -steps=5 -nsim=100
Swift 0.96
RunID: run002
Progress: Thu, 22 Jan 2015 17:30:35-0600
Progress: Thu, 22 Jan 2015 17:30:36-0600 Submitting:100
Progress: Thu, 22 Jan 2015 17:30:49-0600 Submitted:100
Progress: Thu, 22 Jan 2015 17:31:04-0600 Submitted:85 Active:15
Progress: Thu, 22 Jan 2015 17:31:05-0600 Stage in:8 Submitted:77 Active:15
Progress: Thu, 22 Jan 2015 17:31:06-0600 Submitted:70 Active:30
Progress: Thu, 22 Jan 2015 17:31:30-0600 Submitted:55 Active:30 Finished successfully:15
Progress: Thu, 22 Jan 2015 17:31:31-0600 Submitted:53 Active:29 Stage out:1 Finished successfully:17
Progress: Thu, 22 Jan 2015 17:31:32-0600 Stage in:1 Submitted:40 Active:29 Finished successfully:30
Progress: Thu, 22 Jan 2015 17:31:33-0600 Submitted:40 Active:30 Finished successfully:30
...
Progress: Thu, 22 Jan 2015 17:32:23-0600 Active:17 Stage out:1 Finished successfully:82
Progress: Thu, 22 Jan 2015 17:32:24-0600 Active:10 Finished successfully:90
Progress: Thu, 22 Jan 2015 17:32:47-0600 Active:6 Stage out:1 Finished successfully:93
Progress: Thu, 22 Jan 2015 17:32:48-0600 Stage out:1 Finished successfully:99
Progress: Thu, 22 Jan 2015 17:32:49-0600 Stage in:1 Finished successfully:100
Progress: Thu, 22 Jan 2015 17:33:02-0600 Active:1 Finished successfully:100
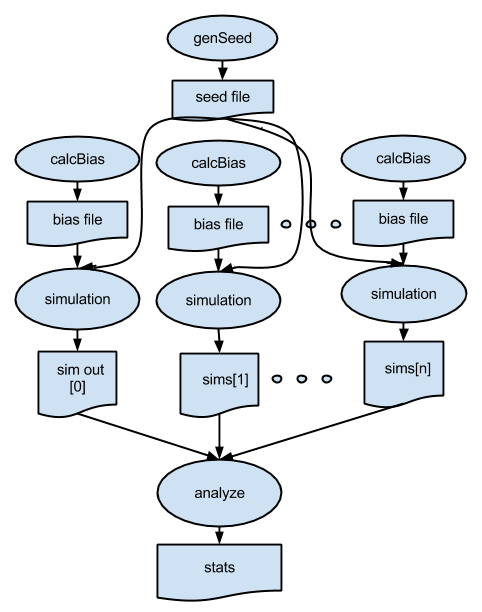
Final status: Thu, 22 Jan 2015 17:33:02-0600 Finished successfully:101Example 6: Specifying more complex workflow patterns
p6.swift expands the workflow pattern of p5.swift to add additional stages to the workflow. Here, we generate a dynamic seed value that will be used by all of the simulations, and for each simulation, we run a pre-processing application to generate a unique "bias file". This pattern is shown below, followed by the Swift script.
type file;

# app() functions for application programs to be called:

app (file out) genseed (int nseeds, file seed_script)
{
  bash @seed_script "-r" 2000000 "-n" nseeds stdout=@out;
}

app (file out) genbias (int bias_range, int nvalues, file bias_script)
{
  bash @bias_script "-r" bias_range "-n" nvalues stdout=@out;
}

app (file out, file log) simulation (int timesteps, int sim_range,
                                     file bias_file, int scale, int sim_count,
                                     file sim_script, file seed_file)
{
  bash @sim_script "-t" timesteps "-r" sim_range "-B" @bias_file "-x" scale
           "-n" sim_count "-S" @seed_file stdout=@out stderr=@log;
}

app (file out, file log) analyze (file s[], file stat_script)
{
  bash @stat_script filenames(s) stdout=@out stderr=@log;
}

# Command line arguments

int  nsim  = toInt(arg("nsim",   "10"));  # number of simulation programs to run
int  steps = toInt(arg("steps",  "1"));   # number of timesteps (seconds) per simulation
int  range = toInt(arg("range",  "100")); # range of the generated random numbers
int  values = toInt(arg("values", "10"));  # number of values generated per simulation

# Main script and data

file simulate_script <"simulate.sh">;
file stats_script <"stats.sh">;
file seedfile <"output/seed.dat">;        # Dynamically generated bias for simulation ensemble

tracef("\n*** Script parameters: nsim=%i range=%i num values=%i\n\n", nsim, range, values);
seedfile = genseed(1,simulate_script);

file sims[];                      # Array of files to hold each simulation output

foreach i in [0:nsim-1] {
  file biasfile <single_file_mapper; file=strcat("output/bias_",i,".dat")>;
  file simout   <single_file_mapper; file=strcat("output/sim_",i,".out")>;
  file simlog   <single_file_mapper; file=strcat("output/sim_",i,".log")>;
  biasfile = genbias(1000, 20, simulate_script);
  (simout,simlog) = simulation(steps, range, biasfile, 1000000, values, simulate_script, seedfile);
  sims[i] = simout;
}

file stats_out<"output/average.out">;
file stats_log<"output/average.log">;
(stats_out,stats_log) = analyze(sims, stats_script);
Note that the workflow is based on data flow dependencies: each simulation depends on the seed value, calculated in this statement:
seedfile = genseed(1);and on the bias file, computed and then consumed in these two dependent statements:
  biasfile = genbias(1000, 20, simulate_script);
  (simout,simlog) = simulation(steps, range, biasfile, 1000000, values, simulate_script, seedfile);
To run:
$ cd swift-tutorial/part06
$ swift p6.swift
Swift 0.96
RunID: run001
Progress: Thu, 22 Jan 2015 17:54:47-0600

*** Script parameters: nsim=10 range=100 num values=10

Progress: Thu, 22 Jan 2015 17:54:48-0600  Submitting:11
Progress: Thu, 22 Jan 2015 17:55:01-0600  Submitted:11
Progress: Thu, 22 Jan 2015 17:55:08-0600  Stage in:3  Submitted:8
Progress: Thu, 22 Jan 2015 17:55:09-0600  Submitted:7  Active:4
Progress: Thu, 22 Jan 2015 17:55:29-0600  Submitted:4  Active:4  Finished successfully:3
Progress: Thu, 22 Jan 2015 17:55:32-0600  Submitted:3  Active:4  Finished successfully:4
Progress: Thu, 22 Jan 2015 17:55:49-0600  Stage in:3  Submitted:6  Active:1  Finished successfully:7
Progress: Thu, 22 Jan 2015 17:55:50-0600  Submitted:6  Active:4  Finished successfully:7
Progress: Thu, 22 Jan 2015 17:55:52-0600  Submitted:6  Active:3  Stage out:1  Finished successfully:7
Progress: Thu, 22 Jan 2015 17:56:10-0600  Submitted:6  Active:4  Finished successfully:11
Progress: Thu, 22 Jan 2015 17:56:31-0600  Stage in:2  Submitted:4  Active:2  Finished successfully:13
Progress: Thu, 22 Jan 2015 17:56:32-0600  Submitted:2  Active:4  Finished successfully:15
Progress: Thu, 22 Jan 2015 17:56:53-0600  Active:2  Finished successfully:19
Progress: Thu, 22 Jan 2015 17:57:14-0600  Stage in:1  Finished successfully:21
Final status: Thu, 22 Jan 2015 17:57:16-0600  Finished successfully:22

# which produces the following output:
$ ls output/
average.log  bias_1.dat  bias_4.dat  bias_7.dat  seed.dat   sim_1.log  sim_2.out  sim_4.log  sim_5.out  sim_7.log  sim_8.out
average.out  bias_2.dat  bias_5.dat  bias_8.dat  sim_0.log  sim_1.out  sim_3.log  sim_4.out  sim_6.log  sim_7.out  sim_9.log
bias_0.dat   bias_3.dat  bias_6.dat  bias_9.dat  sim_0.out  sim_2.log  sim_3.out  sim_5.log  sim_6.out  sim_8.log  sim_9.out

# Each sim_N.out file is the sum of its bias file plus newly "simulated" random output scaled by 1,000,000:

$ cat output/bias_0.dat
     302
     489
      81
     582
     664
     290
     839
     258
     506
     310
     293
     508
      88
     261
     453
     187
      26
     198
     402
     555

$ cat output/sim_0.out
64000302
38000489
32000081
12000582
46000664
36000290
35000839
22000258
49000506
75000310
We produce 20 values in each bias file. Simulations of less than that number of values ignore the unneeded number, while simualtions of more than 20 will use the last bias number for all remaining values past 20.
|
|
As an exercise, adjust the code to produce the same number of bias values as is needed for each simulation. As a further exercise, modify the script to generate a unique seed value for each simulation, which is a common practice in ensemble computations. |
Example 7: MPI Hello
p7.swift is a basic "Hello World!" example that shows you how to run MPI applications.
Here we have a simple MPI code mpi_hello.c that has each MPI rank sleep for a user-specified duration
and then print the processor name on which the rank is executing followed by "Hello World!".
Note that unlike the previous examples the mpi application is not called directly in the app definition.
Instead it is called as an argument to mpiwrap. mpiwrap manages the system specific invocation such as mpiexec or srun,
required to launch an MPI task and takes the number of processes to launch as an argument followed by the path to the mpiapp and it’s arguments.
Now we will explore configuration options that are used to specify the shape of the compute resource.
The nersc.conf file shows two configurations for Edison, edison and edison_multinode. First we will now look at the configuration
that we used for running regular tasks and how that needs to be modified in order to run MPI tasks. In the site configuration edison
we set the following in the site execution options block :
options {
    maxJobs         : 1           # Max jobs submitted to LRM
    nodeGranularity : 1           # Nodes requested will be multiples of this
    maxNodesPerJob  : 1           # Max Nodes that can be requested per job
    tasksPerNode    : 24          # Tasks per Node, This is not used here
    maxJobTime      : "00:25:00"  # Time requested per job
    jobQueue        : "debug"
}
Here is a brief description of the config options:
-
maxJobs: Upper limit on the number of jobs that could be submitted to the Compute resource’s Resource manager(slurm, pbs etc). Swift may submit fewer job to the resource if it determines that fewer jobs are sufficient to complete the workflow. -
nodeGranularity: This is the granularity of the increments by which additional nodes might be requested per Job. For eg, if you set nodeGranularity=2 and maxNodesPerJob=4, Swift will request either 2 or 4 nodes per Job. -
maxNodesPerJob: This is the upper limit on the number of nodes that could be requested per Job submitted to the resource manager. -
tasksPerNode: These are the number of tasks that the swift-worker running on each node is allowed to run in parallel. -
jobQueue: This is the queue to which we submit our resource requests to.
The edison config gets you a single node, which runs 24 tasks per node. Next we see the
configuration that we will use for our MPI application edison_multinode.
options {
   maxJobs         : 1                       # Max jobs submitted to LRM
   nodeGranularity : 2                       # Nodes requested will be multiples of this
   maxNodesPerJob  : 2                       # Max nodes that can be requested per job
   maxJobTime      : "00:25:00"              # Time requested per job
   jobQueue        : "debug"
   jobOptions {
      jobType     : "single"                   # Submit jobs via aprun mechanism
   }
}
Here we request a single job which requests nodes in multiple of 2 with a maximum of 2 nodes. With jobOptions.jobType set to "single" we specify that we will launch only a single swift-worker per block of resources. The swift worker also launches a single task per block of 2 nodes with tasksPerNode not set. This allows us to launch MPI apps which often use multiple node.
type file;

string curdir = java("java.lang.System","getProperty","user.dir");

app (file out, file err) mpi_hello (int time, int nproc)
{
    mpiwrap nproc mpiapp time stdout=@out stderr=@err;
}

int    nsim   = toInt(arg("nsim",   "10"));
int    time   = toInt(arg("time",   "1"));
int    nproc  = toInt(arg("nproc",  "56"));

global string mpiapp = arg("mpiapp", curdir+"/mpi_hello");

foreach i in [0:nsim-1] {
  file mpiout <single_file_mapper; file=strcat("output/mpi_",i,".out")>;
  file mpierr <single_file_mapper; file=strcat("output/mpi_",i,".err")>;
  (mpiout, mpierr) = mpi_hello(time, nproc);
}
To run:
$ cd swift-tutorial/part07
# Run the test locally on the login node itself
$ swift p7.swift
Swift trunk git-rev: 8873d3d69e3beebde12642c2e4c344a46a60f9af heads/master 6284 (modified locally)
RunID: run004
Progress: Tue, 13 Dec 2016 22:16:01-0800
Progress: Tue, 13 Dec 2016 22:16:02-0800  Active:10
Final status: Tue, 13 Dec 2016 22:16:05-0800  Finished successfully:10


# Run the test on the cluster
$ swift -config nersc.conf -sites edison_multinode p7.swift
Swift trunk git-rev: 8873d3d69e3beebde12642c2e4c344a46a60f9af heads/master 6284 (modified locally)
RunID: run002
Progress: Thu, 08 Dec 2016 13:13:03-0800
Progress: Thu, 08 Dec 2016 13:13:04-0800  Submitted:10
Progress: Thu, 08 Dec 2016 13:13:34-0800  Submitted:10
Progress: Thu, 08 Dec 2016 13:14:04-0800  Submitted:10
Progress: Thu, 08 Dec 2016 13:14:34-0800  Submitted:10
Progress: Thu, 08 Dec 2016 13:15:04-0800  Submitted:10
Progress: Thu, 08 Dec 2016 13:15:34-0800  Submitted:10
...
Progress: Thu, 08 Dec 2016 13:53:06-0800  Active:10
Progress: Thu, 08 Dec 2016 13:53:36-0800  Active:10
Progress: Thu, 08 Dec 2016 13:54:06-0800  Active:10
Progress: Thu, 08 Dec 2016 13:54:36-0800  Active:10
Progress: Thu, 08 Dec 2016 13:54:41-0800  Active:9  Finished successfully:1
Progress: Thu, 08 Dec 2016 13:54:53-0800  Active:8  Finished successfully:2
Progress: Thu, 08 Dec 2016 13:55:03-0800  Active:7  Finished successfully:3
Progress: Thu, 08 Dec 2016 13:55:17-0800  Active:6  Finished successfully:4
Progress: Thu, 08 Dec 2016 13:55:34-0800  Active:5  Finished successfully:5
Progress: Thu, 08 Dec 2016 13:55:44-0800  Active:4  Finished successfully:6
Progress: Thu, 08 Dec 2016 13:56:00-0800  Active:3  Finished successfully:7
Progress: Thu, 08 Dec 2016 13:56:12-0800  Active:2  Finished successfully:8
Progress: Thu, 08 Dec 2016 13:56:42-0800  Active:2  Finished successfully:8
Progress: Thu, 08 Dec 2016 13:56:45-0800  Active:1  Finished successfully:9
Final status: Thu, 08 Dec 2016 13:56:57-0800  Finished successfully:10


# cat output/mpi_0.out
Executing with srun :
[Rank:29]Hello World!
[Rank:30]Hello World!
[Rank:31]Hello World!
[Rank:32]Hello World!
[Rank:33]Hello World!
[Rank:34]Hello World!
[Rank:35]Hello World!
[Rank:36]Hello World!
[Rank:37]Hello World!
...
Example 8: A two stage MPI workflow
Expanding on the previous example, we will look at a simple workflow that has a distributed phase followed by an aggregation phase. For this example we are using an MPI program hipi.c that calculates the value of Pi in a distributed fashion.
type file;

string curdir = java("java.lang.System","getProperty","user.dir");

app (file out, file err) pi (int intervals, int duration )
{
    mpiwrap 48 pibinary intervals duration stdout=@out stderr=@err;
}

app (file out) summarize (file pi_runs[] )
{
    grep "^Pi:" filenames(pi_runs) stdout=@out;
}

int  duration    = toInt(arg("duration",  "0"));  # Min duration of pi run (artificial)

file pi_out[] <simple_mapper; prefix="output/pi_", suffix=".out">;
file pi_err[] <simple_mapper; prefix="output/pi_", suffix=".err">;

global string pibinary = arg("executable", curdir+"/hipi");

foreach interval in [10,100,1000,10000,100000] {
    (pi_out[interval],pi_err[interval]) = pi(interval, duration);
}

file summary <"output/summary.out">;

summary = summarize(pi_out);
To run this script, run the following command:
$ cd swift-tutorial/part08
# This runs the workflow on the default site, localhost
$ swift p8.swift
Swift 0.96
RunID: run001
Progress: Thu, 22 Jan 2015 16:21:51-0600
Progress: Thu, 22 Jan 2015 16:21:52-0600  Active:1
Final status:Thu, 22 Jan 2015 16:22:11-0600  Finished successfully:1


# To run the workflow on a supercomputer/cluster, specify the config to use as well as the site
# For eg. to run with a multinode configuration on the Edison (NERSC) supercomputer:
$ swift -config nersc.conf -sites edison_multinode p8.swift
Swift trunk git-rev: 8873d3d69e3beebde12642c2e4c344a46a60f9af heads/master 6284 (modified locally)
RunID: run002
Progress: Wed, 14 Dec 2016 15:05:30-0800
Progress: Wed, 14 Dec 2016 15:05:31-0800  Submitted:5
Progress: Wed, 14 Dec 2016 15:06:01-0800  Submitted:5
Progress: Wed, 14 Dec 2016 15:06:31-0800  Submitted:5
Progress: Wed, 14 Dec 2016 15:07:01-0800  Submitted:5
...
Progress: Wed, 14 Dec 2016 15:26:32-0800  Submitted:5
Progress: Wed, 14 Dec 2016 15:26:48-0800  Submitted:4  Active:1
Progress: Wed, 14 Dec 2016 15:27:18-0800  Submitted:4  Active:1
Progress: Wed, 14 Dec 2016 15:27:37-0800  Submitted:3  Active:1  Finished successfully:1
Progress: Wed, 14 Dec 2016 15:28:07-0800  Submitted:3  Active:1  Finished successfully:1
Progress: Wed, 14 Dec 2016 15:28:33-0800  Stage in:1  Submitted:2  Finished successfully:2
Progress: Wed, 14 Dec 2016 15:28:34-0800  Submitted:2  Active:1  Finished successfully:2
Progress: Wed, 14 Dec 2016 15:29:04-0800  Submitted:2  Active:1  Finished successfully:2
Progress: Wed, 14 Dec 2016 15:29:34-0800  Submitted:2  Active:1  Finished successfully:2
Progress: Wed, 14 Dec 2016 15:29:35-0800  Submitted:1  Active:1  Finished successfully:3
Progress: Wed, 14 Dec 2016 15:30:05-0800  Submitted:1  Active:1  Finished successfully:3
Progress: Wed, 14 Dec 2016 15:30:35-0800  Submitted:1  Active:1  Finished successfully:3
Progress: Wed, 14 Dec 2016 15:30:36-0800  Active:1  Finished successfully:4
Progress: Wed, 14 Dec 2016 15:30:56-0800  Active:1  Finished successfully:5
Final status: Wed, 14 Dec 2016 15:31:14-0800  Finished successfully:6


$ cat output/pi_0010.out
Executing with srun :
Process 25 out of 48 on host nid00393
Process 26 out of 48 on host nid00393
...
Process 22 out of 48 on host nid00392
Process 23 out of 48 on host nid00392
Args: argc=3 n=10 sleep=0
Process 0 out of 48 on host nid00392
Pi: 3.1424259850010978 Error: 0.0008333314113047
Elapsed time: 0.000125

$ cat output/summary.out
output/pi_0010.out:Pi: 3.1424259850010978 Error: 0.0008333314113047
output/pi_0100.out:Pi: 3.1416009869231245 Error: 0.0000083333333314
output/pi_1000.out:Pi: 3.1415927369231262 Error: 0.0000000833333331
output/pi_10000.out:Pi: 3.1415926544231265 Error: 0.0000000008333334
output/pi_100000.out:Pi: 3.1415926535981269 Error: 0.0000000000083338
Additional information and references
Mock "science applications" used in the workflow tutorial
This tutorial is based on two trivial example programs,
simulate.sh and stats.sh, (implemented as bash shell scripts)
that serve as easy-to-understand proxies for real science
applications. These "programs" behave as follows.
simulate.sh
The simulation.sh script serves as a trivial proxy for any more complex scientific simulation application. It generates and prints a set of one or more random integers in the range [0-2^62) as controlled by its command line arguments, which are:
$ ./app/simulate.sh --help
./app/simulate.sh: usage:
    -b|--bias       offset bias: add this integer to all results [0]
    -B|--biasfile   file of integer biases to add to results [none]
    -l|--log        generate a log in stderr if not null [y]
    -n|--nvalues    print this many values per simulation [1]
    -r|--range      range (limit) of generated results [100]
    -s|--seed       use this integer [0..32767] as a seed [none]
    -S|--seedfile   use this file (containing integer seeds [0..32767]) one per line [none]
    -t|--timesteps  number of simulated "timesteps" in seconds (determines runtime) [1]
    -x|--scale      scale the results by this integer [1]
    -h|-?|?|--help  print this help
$
All of these arguments are optional, with default values indicated above as [n].
With no arguments, simulate.sh prints 1 number in the range of 1-100. Otherwise it generates n numbers of the form (R*scale)+bias where R is a random integer. By default it logs information about its execution environment to stderr. Here is some examples of its usage:
$ simulate.sh 2>log
       5
$ head -4 log

Called as: /home/wilde/swift/tut/CIC_2013-08-09/app/simulate.sh:
Start time: Thu Aug 22 12:40:24 CDT 2013
Running on node: login01.osgconnect.net

$ simulate.sh -n 4 -r 1000000 2>log
  239454
  386702
   13849
  873526

$ simulate.sh -n 3 -r 1000000 -x 100 2>log
 6643700
62182300
 5230600

$ simulate.sh -n 2 -r 1000 -x 1000 2>log
  565000
  636000

$ time simulate.sh -n 2 -r 1000 -x 1000 -t 3 2>log
  336000
  320000
real    0m3.012s
user    0m0.005s
sys     0m0.006s
stats.sh
The stats.sh script serves as a trivial model of an "analysis" program. It reads N files each containing M integers and simply prints the average of all those numbers to stdout. Similar to simulate.sh it logs environmental information to the stderr.
$ ls f*
f1  f2  f3  f4

$ cat f*
25
60
40
75

$ stats.sh f* 2>log
50
A Summary of Swift in a nutshell
-
Swift scripts are text files ending in
.swiftTheswiftcommand runs on any host, and executes these scripts.swiftis a Java application, which you can install almost anywhere. On Linux, just unpack the distributiontarfile and add itsbin/directory to yourPATH. -
Swift scripts run ordinary applications, just like shell scripts do. Swift makes it easy to run these applications on parallel and remote computers (from laptops to supercomputers). If you can
sshto the system, Swift can likely run applications there. -
The details of where to run applications and how to get files back and forth are described in configuration files separate from your program. Swift speaks ssh, PBS, Condor, SLURM, LSF, SGE, Cobalt, and Globus to run applications, and scp, http, ftp, and GridFTP to move data.
-
The Swift language has 5 main data types:
boolean,int,string,float, andfile. Collections of these are dynamic, sparse arrays of arbitrary dimension and structures of scalars and/or arrays defined by thetypedeclaration. -
Swift file variables are "mapped" to external files. Swift sends files to and from remote systems for you automatically.
-
Swift variables are "single assignment": once you set them you can not change them (in a given block of code). This makes Swift a natural, "parallel data flow" language. This programming model keeps your workflow scripts simple and easy to write and understand.
-
Swift lets you define functions to "wrap" application programs, and to cleanly structure more complex scripts. Swift
appfunctions take files and parameters as inputs and return files as outputs. -
A compact set of built-in functions for string and file manipulation, type conversions, high level IO, etc. is provided. Swift’s equivalent of
printf()istracef(), with limited and slightly different format codes. -
Swift’s parallel
foreach {}statement is the workhorse of the language, and executes all iterations of the loop concurrently. The actual number of parallel tasks executed is based on available resources and settable "throttles". -
Swift conceptually executes all the statements, expressions and function calls in your program in parallel, based on data flow. These are similarly throttled based on available resources and settings.
-
Swift also has
ifandswitchstatements for conditional execution. These are seldom needed in simple workflows but they enable very dynamic workflow patterns to be specified.
We will see many of these points in action in the examples below. Lets get started!
Remote site configuration
Part04 onwards, the tutorial is designed to run on remote computational resources. The following sections outline the steps required to enable swift to run tasks remotely.
Setting up ssh-keys for password-less acccess : How-to-passwordless-login
Midway cluster at UChicago
The Midway cluster is a shared computational resource administered by the Research Computing Center at the University of Chicago. Here’s documentation on the RCC resources: RCC docs
Here are the steps to run the tutorial on the Midway cluster:
-
Ensure you have enabled ssh keys for passwordless access to the Midway login nodes.
-
If you are running on the midway login nodes you set jobManager: "local:slurm"
-
Set workDirectory to /tmp/your_username_on_midway
-
Set the following line in the swift-tutorial/swift.conf file.
sites: [midway]Notes:
# The following commands are to be executed on the Midway login node
# Check your account and balance
accounts balance

# List queues
qstat -q

# List your jobs and state
qstat -u $USER
Beagle Supercomputer (Cray)
The Beagle supercomputer is a Cray XE6 system at the Computation Institute. Here is documentation on Beagle: Beagle docs
Here are the steps to run the tutorial on the Beagle supercomputer:
-
Ensure you have enabled ssh keys for passwordless access to the Beagle login nodes.
-
If you are running on the beagle login nodes, set jobManager: "local:pbs"
-
Find your project name/allocation and set jobProject : "YOUR_PROJECT_ON_BEAGLE"
-
Set userHomeOverride : "/lustre/beagle2/YOUR_USERNAME_ON_BEAGLE/swiftwork"
-
Set workDirectory : "/tmp/YOUR_USERNAME_ON_BEAGLE/swiftwork"
-
Set the following line in the swift-tutorial/swift.conf file.
sites: [beagle]
Notes for beagle:
# The following commands should be executed on a beagle login node
# To check your allocation and project on Beagle:
show_alloc

# List queues
qstat -q

# List your jobs and state
qstat -u $USER

# Visual representation of current node allocation status
xtnodestat -d
Blues cluster at LCRC
Blues is a compute cluster at the Laboratory Computing Resource Center (LCRC) at Argonne National Laboratory. The blues cluster features 310 nodes, with 16 cores per node (Intel Sandybridge). Here’s documentation on Blues: Blues docs
Here are the steps to run the tutorial on the Blues cluster
-
Ensure you have enabled ssh keys for passwordless access to the Blues login nodes (blues.lcrc.anl.gov).
-
If you are ru nning on the blues login nodes, set jobManager: "local:pbs"
-
Set workDirectory : "/home/YOUR_USERNAME_ON_BLUES/swiftwork"
-
Set the following line in the swift-tutorial/swift.conf file.
sites: [blues]
Notes for blues:
# The following commands should be executed on a beagle login node
# List queues
qstat -q

# List your jobs and state
qstat -u $USER
OSGConnect at UChicago
The Open Science Grid (OSG) and University of Chicago provides a service to access a vast pool of opportunistic computational resources spread across the U.S. Here’s documentation on the OSG Connect resources: OSGConnect docs.
Here are the steps to run the tutorial via OSGConnect on the Open Science Grid:
-
Ensure you have enable ssh keys for passwordless access to the OSGConnect login nodes.
-
If you are running on the OSGConnect login node set jobManager: "local:condor"
-
Set projectname : "YOUR_PROJECTNAME_ON_OSG"
-
Set workDirectory : "/tmp/YOUR_USERNAME_ON_OSG"
-
Set the following line in the swift-tutorial/swift.conf file:
sites: [osgc]
Notes for OSGConnect :
# The following commands should be executed on the OSGConnect login node
# To check/select your project on OSGConnect
connect project

# List your jobs and state
condor_q $USER
Amazon EC2
Amazon Elastic Compute Cloud (Amazon EC2) is a web service that provides resizable compute capacity in the cloud. Getting cloud resources on-demand from Amazon is now as simple as setting up an account and attaching a credit card.
-
Follow steps outlined in Amazon docs to set up an account and install local dependencies.
-
Set ec2CredentialsFile: "ABSOLUTE_PATH_TO_YOUR_AWS_CREDENTIALS_FILE"
-
Ensure that ec2KeypairFile points to a valid path
-
If you update ec2WorkerImage, ensure that it is a ubuntu image
-
Set the following line in the swift-tutorial/swift.conf file:
sites: [aws]
|
|
If you kill a swift-run before completion, Swift would not be able to terminate your instances. This can lead to instances continuing to run and costing you money. Please ensure that all swift-worker instances have terminated by logging into the EC2 dashboard once you’ve completed the tutorial. |
Collection of Ad-Hoc Nodes
Using this configuration scheme swift allows you to use multiple independent nodes as a pool of resources. Assume that you have access to N machines ( ad-hoc-1.foo.net, ad-hoc-2.foo.net … ad-hoc-N.foo.net ) You can replicate the site.ad-hoc-1 site definition block for each site you have access to, and swift will run tasks on all of them.
-
Ensure you have enable ssh keys for passwordless access to the each of the ad-hoc Nodes.
-
Replicate the site block for each ad-hoc node
-
For each site block, set URL : URL_OF_AD_HOC_MACHINE_N
-
Set workDirectory : "/tmp/USERNAME_ON_AD-HOC-N/work"
sites: [<ad-hoc-1.foo.net>, <ad-hoc-1.foo.net>, ... <ad-hoc-N.foo.net>]
Multiple sites
Swift allows you to run you applications on multiple sites that you have access to. Let’s say you would like to run you applications on Midway and Beagle.
-
Ensure you have enable ssh keys for passwordless access to the both Midway and Beagle
-
Set the site specific variables for both sites in the swift-tutorial/setup.sh file.
-
Set the following line in the swift-tutorial/swift.conf file:
sites: [midway, beagle]
TACC Stampede(XSEDE)
The TACC Stampede* system is a 10 PFLOPS (PF) Dell Linux Cluster based on 6400+ Dell PowerEdge server nodes, each outfitted with 2 Intel Xeon E5 (Sandy Bridge) processors and an Intel Xeon Phi Coprocessor (MIC Architecture). Here’s a great reference for stampede: Stampede User Guide
Here are the steps to run the tutorial on Stampede:
|
|
The preferred way to run the tutorial is from the stampede login nodes rather than from a remote system. |
-
Ensure you have enabled ssh keys for passwordless access to the Stampede login nodes (Only necessary if running from remote)
-
If you are running on login<ID>.stampede.tacc.utexas.edu, you set jobManager: "local:slurm"
-
Set workDirectory to /tmp/your_username_on_stampede
-
Set the following line in the swift-tutorial/swift.conf file.
sites: [stampede]|
|
The network between Stampede and UChicago is unusually slow, avoid network traffic if possible. |
|
|
Stampede uses Lustre parallel shared filesystem. The environment variables $HOME, $WORK, $SCRATCH point at different Lustre filesystems all of which are accessible from the login and compute nodes. |
|
|
There’s a limit of one job per user on the development queue (∴ maxJobs=1) |
Notes:
# List queues and status
sinfo -o "%20P %5a %.10l %16F"

# List your jobs and state
showq -u $USER

# Interactive shell for debugging:
srun -p development -t 0:30:00 -n 32 --pty /bin/bash -l
Blacklight PSC (XSEDE)
Blacklight is an SGI UV 1000cc-NUMA shared-memory system comprising 256 blades. Each blade holds 2 Intel Xeon X7560 (Nehalem) eight-core processors, for a total of 4096 cores across the whole machine. Here’s documentation for Blacklight: Blacklight User Guide
Here are the steps to run the tutorial on Blacklight:
The preferred way to run the tutorial is from the Blacklight login nodes rather than from a remote system.
-
Ensure you have enabled ssh keys for passwordless access to the Blacklight login nodes (Only necessary if running from remote)
-
If you are running on the login nodes, set jobManager: "local:pbs"
-
Set workDirectory to /tmp/your_username_on_blacklight
-
Set the following line in the swift-tutorial/swift.conf file.
sites: [blacklight]|
|
Blacklight has $WORK, $HOME mounted on a shared filesystem. |
Notes:
# List queues and status
qstat -q

# List your jobs and state
qstat -u $USER
Gordon SDSC (XSEDE)
Gordon is a dedicated XSEDE cluster designed by Appro and SDSC consisting of 1024 compute nodes and 64 I/O nodes. Here is some additional documentation on Gordon: Gordon User Guide
|
|
The swift client cannot run on the gordon login nodes due to memory limits on the machine. Swift must be run from a remote location. |
Here are the steps to run the tutorial on Gordon:
-
Ensure you have enabled ssh keys for passwordless access to the Gordon login nodes
-
Set workDirectory to /tmp/your_username_on_blacklight
-
Set the following line in the swift-tutorial/swift.conf file.
sites: [gordon]Notes:
# List queues and status
qstat -q

# List your jobs and state
qstat -u $USER
Trestles SDSC (XSEDE)
Trestles is a dedicated XSEDE cluster designed by Appro and SDSC consisting of 324 compute nodes. Each compute node contains four sockets, each with an 8-core 2.4 GHz AMD Magny-Cours processor, for a total of 32 cores per node and 10,368 total cores for the system. . Here’s documentation for Trestles: Trestles User Guide
|
|
The swift client cannot run on the gordon login nodes due to memory limits on the machine. Swift must be run from a remote location. |
Here are the steps to run the tutorial on Trestles:
-
Ensure you have enabled ssh keys for passwordless access to the Trestles.
-
Set workDirectory to /tmp/your_username_on_blacklight
-
Set the following line in the swift-tutorial/swift.conf file.
sites: [trestles]Notes:
# List queues and status
qstat -q

# List your jobs and state
qstat -u $USER
Edison at NERSC
Edison is NERSC’s newest supercomputer, a Cray XC30, with a peak performance of 2.57 petaflops/sec, 133,824 compute cores, 357 terabytes of memory, and 7.56 petabytes of disk. Here’s documentation on Edison : Edison docs
Here are the steps to run the tutorial on Edison
-
Ensure you have enabled ssh keys for passwordless access to the Edison login nodes (edison.nersc.gov).
-
If you are running on the Edison login nodes, set jobManager: "local:pbs"
-
Set workDirectory : "/home/YOUR_USERNAME_ON_EDISON/swiftwork"
-
Set the following line in the swift-tutorial/swift.conf file.
sites: [Edison]
Notes for Edison:
# The following commands should be executed on the Edison login node
# List queues
qstat -q

# List your jobs and state
qstat -u $USER
Config note for Edison:
In order to enable rapid connection between Swift service (on login node) and worker (on compute nodes), the worker must know the network interface connecting login and compute nodes. To achieve this, worker will probe all the interface at startup. This can cause delays in completion of Swift run. To facilitate a quick connection, Swift config uses a directive called internalHostName whose value is an IP address. Depending on which login node the Swift service runs, the value of this IP differs. The following table shows current mapping of IP addresses between various login nodes and compute nodes on Edison:
| Login Node | IP Address |
|---|---|
edison10 |
128.55.72.30 |
edison01 |
128.55.72.21 |
edison02 |
128.55.72.22 |
edison03 |
128.55.72.23 |
edison04 |
128.55.72.24 |
edison05 |
128.55.72.25 |
edison06 |
128.55.72.26 |
edison07 |
128.55.72.27 |
edison08 |
128.55.72.28 |
edison09 |
128.55.72.29 |
For instance, if you are logged in edison05, the config for a short run will look like:
site.edison {
 execution {
 ...
  options {
    ...
    internalHostName: "128.55.72.29"
    ...
    jobOptions {
     ...
    }
    ...
  }
 }
 ...
 }
}

sites: edison
...
...
Changing you default shell on NERSC systems
-
Login to the NERSC Information Management page, NIM
-
Once you’ve logged onto the NIM, Go to the "ACTIONS" dropdown at the top.
-
Select "Change Shell" and update the shell to bash for your machines.
-
Save, and try logging into the machines to confirm that the changes have taken effect.
Legion at University College London
Legion is a heterogeneous cluster linked together by a fast network at the University College London. Here’s documentation on Edison : Legion docs
Here are the steps to run the tutorial on Legion: The swift 0.96 package has been modified to work correctly with Legion. The package can be downloaded from here : Swift-0.96-sge-mod.tar.gz
-
Login to legion.rc.ucl.ac.uk
-
The tutorial is designed to be run on the cluster from the login node.
-
Set the following line in the swift-tutorial/swift.conf file.
+
sites: [Legion]Notes for Legion:
Please note that when jobs are submitted to the queue, you will see the following error message which can be ignored: "Error: No parallel environment specified"